A daily updated blog typed by someone with painty hands, oil under his fingernails and the smell of solder in his nostrils who likes making all sort of models and miniatures. And fixing things.
Sunday, March 31, 2013
Brede lifeboat progress
Progress has been made with the Brede lifeboat project. I've got a deadline and this model is taking longer than I expected.
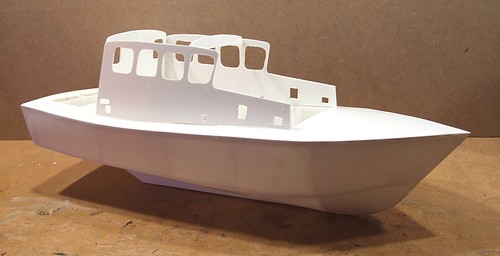
The hull is clad in sheets of plastic over the formers. These have been reduced in height and a deck fitted. Checking with a ruler shows that everything is as accurate as eyeballing along the sides makes it appear. I am much relieved by this as I really didn't want to make another hull.
Above the deck line, a superstructure is appearing. It might look a bit rough but I think I know what I'm doing. Those window holes will be tidyed up with overlays for the frames. The bottom edge is hidden behind another strip which the prototype handily has.
I'm very proud of the fact that everything you see has been scratchbuilt. It was all sheet plastic a few weeks ago and now looks a lot like the boat it is intended to represent. There is something incredibly satisfying about the process even if it is frustrating at times. Maybe it's overcoming the problems that provides the pleasure, or maybe it's just that I've created a reasonable size model and it's looking OK. Maybe a man in China with an injection moulding machine could do better but I'm pretty sure he isn't interested so I'll have to live without him.
Saturday, March 30, 2013
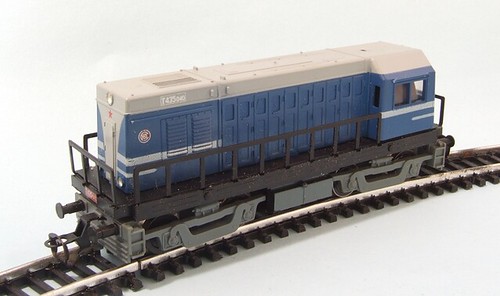
Ingenious diesel chassis
The box of East German TT trains have been hanging around for a while so a couple of days ago, we decided to have a proper look with a view to handing the whole lot over to a dealer. In an effort to secure a decent offer, all the locos were checked to see if they worked.
As it turned out, despite being dusty, with a bit of prodding from some 12V DC, they all did. We soon had little engines running around a 2ft diameter circle on the dining table. All good fun.
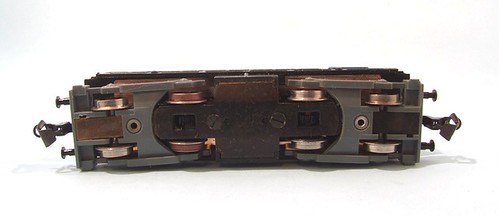
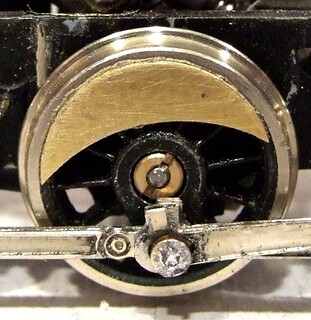
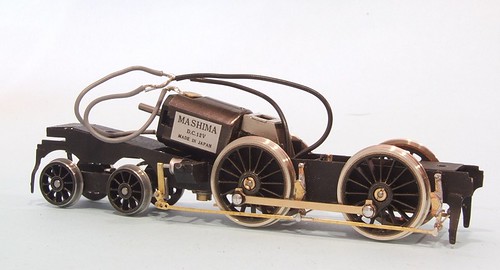
Looking under the BR 107 engine, I spotted that the makers had been rather clever.
While it might look as though the engine runs on a pair of bogies, it's a fraud. In reality, the mechanism is a simple 4-wheel unit with the outer bogie wheels swinging around like pony trucks on a steam engine. Given the limited swing of the bogies and crudeness of all the running gear (those treads are huge) everything looks like it should.
I'm not sure if this helps anyone but I bet there are some narrow gauge fans out there who could use a similar trick.
Friday, March 29, 2013
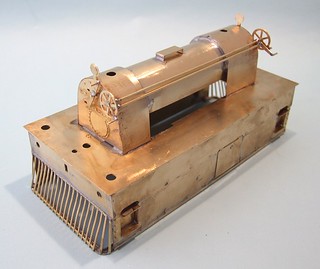
All the parts, mostly in the right order
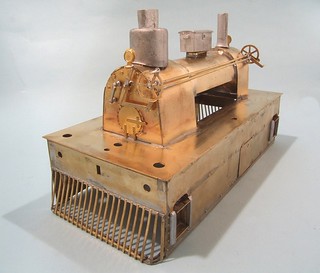
I hope everyone appreciates this. Getting to this stage took at least 2 hours!After yesterdays admission of error, I attacked the soldered joins making up the smokebox/boiler/firebox unit and reduced the parts to brass bits with blobs of solder on the edges. Mr Gas torch was very useful here as I could zap heat into the joints and shove scalpels into the3 metal to prise apart the components.
After this, re-assembly was simple-ish. Yes I had to file some of the solder blobs away with a coarse file. Others were melted and smeared around the metal so they didn't get in the way. I didn't burn my fingers and even remembered to shorten the boiler very slightly for a better fit. It's not pretty under there but since no-one will see, I don't care.
After cleaning up, the whitemetal bits started to find their way on, held in place with superglue. I reckoned I'd finished soldering until I spotted that the nuts to bolt the thing to the chassis haven't been fitted yet. Good job they are well away from the glued on bits!
Of course the sharp eyed will have spotted that the floor is still back to front. The difference between the two ends is the holes for sandboxes and I will hide these when I make up a new wooden floor.
Thursday, March 28, 2013
A mistake revealed
Oops. I had a horrible feeling this would happen.
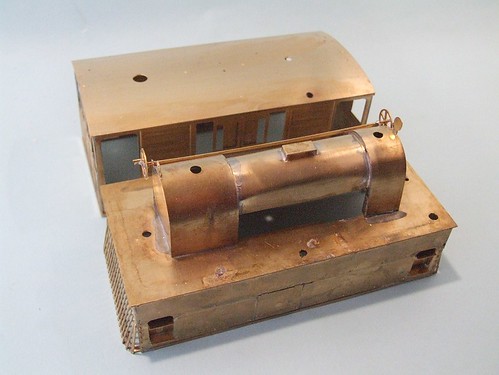
Now I have a completed body, if I place it on the skirts and peer down through the chimney hole, it doesn't line up with the hole in the smokebox.
Why?
Simple. I am stupid.
You see, there are two wrappers in the boiler area - once for the firebox and another for the smokebox. One is narrower than the other. And I got them the wrong way around. Smokebox wrapper on firebox and the hole in the roof doesn't line up.
I could just fit the chimney through the roof and be done with it. Seeing the compromise would be very difficult once the body is on. The trouble is, I would know it is wrong.
So, I now have to dismantle the various bits in the middle and put them together properly. The way I would have had I looked at the plan so generously provided by Tanllan. Good job this is fun isn't it?
Wednesday, March 27, 2013
Roof Rolling
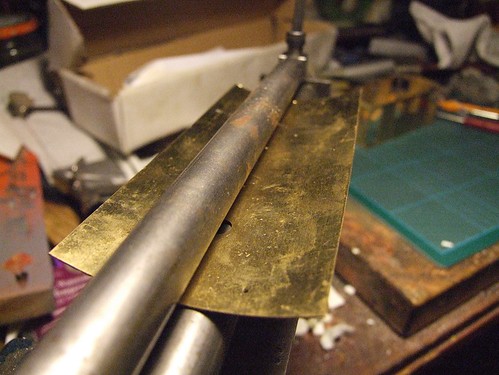
I've got the proper tool, so this time I'm going to use it. Having spent all that money years ago on a nice set of GW Models rolling bars, it seems that the tram loco roof should make use of them.
If I'm honest, they aren't the easiest tool to use - no fault of the tool itself which is fantastic, it's just that I only sort of get how they should work. As I understand it, the top roller is slackened off, the metal inserted between them and then the roller is tightened again. You roll the metal back and forth to impart a bend. Then the top roller is screwed down further, the metal rolled again for a sharper bend. This process continues until you have a tube if that's what you want.
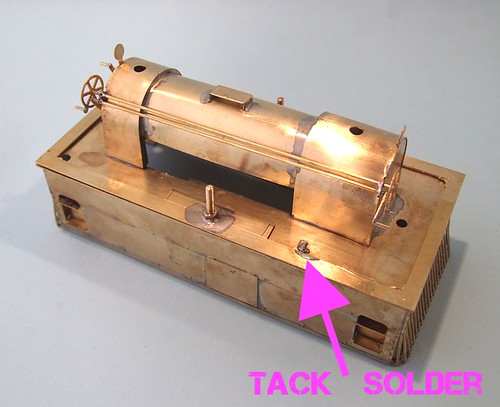
I managed to over-bend the roof but placing it on a flat surface and gently pushing down on it reduced the curvature until it fitted the body. Then it was tack soldered in place before the seam joints were finished with the gas torch. A touch of cleaning up and the job is done. And yes you could just bend the thing around a beer can. It's just not as "proper" as wot I did. OK?
Tuesday, March 26, 2013
Starting the Y6 shed
Well, it is a bit shed like isn't it?
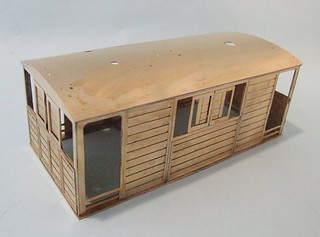
To be honest there's very little to say about this stage of construction. The ends make up with rebates to accept the sides, solving the old "Do the sides overlap the ends or vise versa?" question. All I had to do was tack solder everything together and once happy, run more solder into the joints to make it all secure.
There aren't guides to aid locating the body on the footplate but this isn't much of a problem. I worked by eye so am probably a fraction of a mm out. Not enough to lose sleep over.
There is a lot of brass at this point so the final joins between body and footplate needed the heat of a gas torch rather than just the soldering iron. I probably could have got away with it but the torch is faster and I still enjoy blowing hot solder along a join.
Monday, March 25, 2013
Growing corn
With the snow ten feet deep outside, what better time to think about ways to model a cornfield at the height of summer - when the snow will only be five feet deep.
Looking at the scene above, I wondered if the modeller had used some sort of matting to produce the corn. The stalks look far too tightly packed and regular for anything planted by hand. Having spent many hours producing fields using plumers hemp, I know how difficult this can be!
Anyway, a few days later, I'm wandering around Ikea when I spot the doormat selection. From a distance, they certainly have a look. The lightling in the store makes the colours far too orange. You even get the straight lines where the corn has been sown along furrows.
Trimming to look like harvest might be difficult - those bristles are tough, but I wonder if there are possibilities here?
Sunday, March 24, 2013
Larger Scale Show 2013
Some shows require a day trip, others quite a bit less. My feelings toward the Larger Scale model railway show were that a couple of hours would be enough. Planning to back in time to make some lunch, I bunged a potato in the oven on a low heat and headed off. The show is 10 minutes drive from my home and most of this took place in light snow. The car park was being organised by freezing stewards carefully parking people on the edges of the roadways so they didn't have both wheels in the soggy grass.
Inside, the exhibition centre was nicely full. First up there was an O gauge foreign layout and beyond this the Gauge 1 test track. The air was thick with meths and steam - always a good sign.
Wandering around, I managed to press my MREmag.com card (first results) into a few hands and had a few useful chats with people behind the stands. It seems there are many good things on the way in the garden railway world. That's in addition to some very good things already crying out for the attention of my wallet. The GER J65 starter kit from Barrett Engineering is now available in electric form for a very reasonable £375. I'm sure one of you would like to buy one for me...
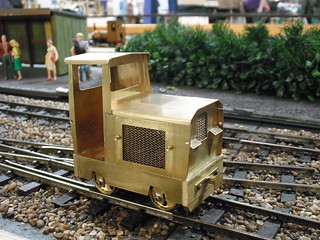
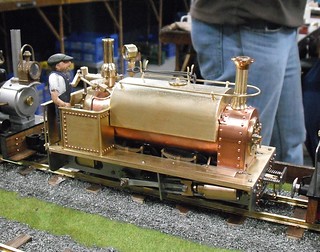
There was some top scratchbuilding on display. The little Simplex G class at the top of this post is a gem. Powered by a Romford Bulldog motor and with both axles driven through a simple set of bevel gears, it runs on wagon wheels and is built to 16mm the foot scale. I look at this sort of model and realise that I could do this, even the engineering bit (probably). What's more, I am really in the mood for a scratchbuilt railway project right now. Not an oddball diesel perhaps, but it is inspirational. Not everything is within my grasp. Looking at a live steam loco "in the brass", I realise that I'd need to learn a lot of engineering to achieve anything similar. It doesn't mean I can't enjoy it though.
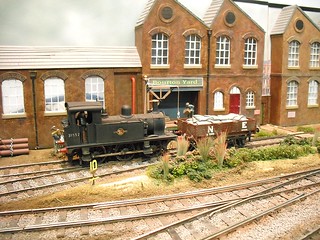
"Larger scale" means O gauge and bigger. I particularly enjoyed Glen Fiddich, not the drink, the layout. Saved from the skip, it's a very attractive model with a lovely distillery at one end. On another model, whose name escapes me, there was a lovely P Class. It's owner couldn't recall the maker, which is probably a good thing as I don't need another loco right now. It would work well on Clayhanger Yard though...Anyway, a good time was had. Fortunatly I like my jacket spuds good and crispy.
Photos from the Larger Scale Show
Saturday, March 23, 2013
Nottingham 2013
My Dad reckons it is 30 years since we first visited Nottinghams model railway exhibition. Back in those days, O levels were a couple of years away for me and we had just joined the local model railway club. Other members told us that Nottingham was one of the shows to visit and since we'd never actually travelled to an exhibition, we hopped on a train and did just that. We visited quite a few times in the intervening period but stopped when the venue moved from a handy in-town site surrounded by top quality greasy spoon fish'n'chip shops (yum) to a sports centre, apart from a trip last year, we've not been back. This year however, we thought it would be fun to visit again.
While there may be free car parking on offer, this apparently comes with "security" which makes me wonder what sort of area the show is held in. It looks OK but since I'd prefer to go by train anyway, that's what we did.
Having enjoyed the trip, dropped into GeeDee Model shop and stuffed our faces with a Weatherspoons Brunch, we followed the instructions to find a bus. This was easy enough and we sat on the top deck gawping at some of the scruffier, but very interesting areas of the city. Sadly I hadn't spotted the instructions telling us where to get off so when the route diverged from the signs for cars, we hopped off and had a 40 minute stroll to the show itself. It might have worn off some of the lunch but I could have lived without it, especially as I recalled the previous years stop being opposite the hall.
One problem for the show organisers is that the hall used in the past is being renovated so they've had to move into a college next door. Initially this was for a year but now 3 years looks more likely.The new venue is like most school based show - a nightmare. There is an assembly hall and sports centre offering descent floor space but the show is too big for these leading to exhibits dotted everywhere. This isn't the organisers fault, everyone who uses a similar venue has exactly the same problem. At least the Nottingham stewards were easily found and never less than helpful directing people around.
At this point I should provide a critique of the event but truth was that when we got there, it was difficult to see the layouts due to the crowds and even if we had been there for that, there were many old friends to catch up with so we spent a lot of time chatting.
I had brought a shopping list which I didn't think would be a problem, but in the event, didn't work out so well:
Clack valves (1 pair)
Cast backhead
BR steam numbers
17A shed plate
GWR numberplate
OK, so the GWR numberplate might have been a challenge as would the shed plate but waterslide transfer numbers?
What's odd is that the trade was good. There were many specialists that you don't see at other shows and the hall certainly hadn't been filled with RTR box-shifters. I guess I was just unlucky.Layout wise, things were good. I'll be honest and admit to not spending much time gawping but there was a cracking 2mm finescale branch line and some roundy-roundys that were providing much entertainment.
The walk back to the bus took 25 minutes and I'm glad we missed the rain. With a bit more pre-planning I think we can sort this. To be honest though, the venue isn't inviting although I'm sure lessons will have been learnt this year.
Photos taken at Nottingham 2013
Friday, March 22, 2013
Brede Building - 3rd time lucky (I hope)
Long time readers of this blog will know that I've had a couple of goes at building a model of the Brede Class lifeboat.
Attempt 1 involved a not very good vac-formed kit which got me interested in the prototype but proved just how difficult it would be to make a descent model.
Attempt 2 got as far as a scratchbuilt hull that looked good until I put the deck on and realised that the back end on one side was all wonky.
Attempt 3 uses a similar assembly method to Attempt 2 except that in that case I used wood, this time it's plastic sheet.
My theory is that I'm more comfortable with plastic. It's a material I use a lot and I get on well with it. Unlike wood for example, if you cut too much off, the missing material can be replaced as long as yo use plenty of solvent. The good people at Humbrol have sent me some tubes of glue and a big bottle of liquid glue. My stocks include plenty of Mek-pak too.
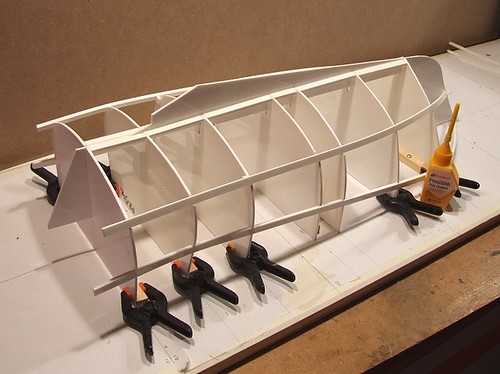
Anyway, I made up a building board - a flat surface with screwed down laths at right angles to the edge. To these slices of the hull are clipped. These slices are taken from a copy of the RNLI plan, stuck to the sheet with spray glue and then slightly modified to take the keel and stringers. Both of these are plastic, the later being long strips of sawn 4mm stuff bought from a model boat supplier.
So far, things are looking good. Hopefully at the end of all this, I'll be writing up the model properly for Model Boats magazine, but I thought you might like a sneak preview.
Thursday, March 21, 2013
Sides
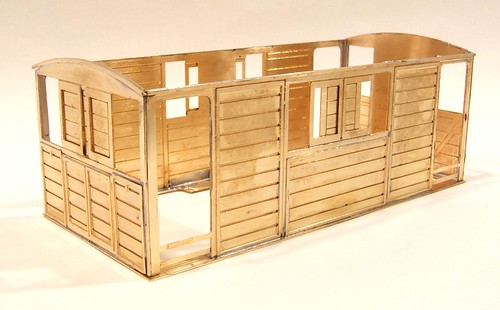
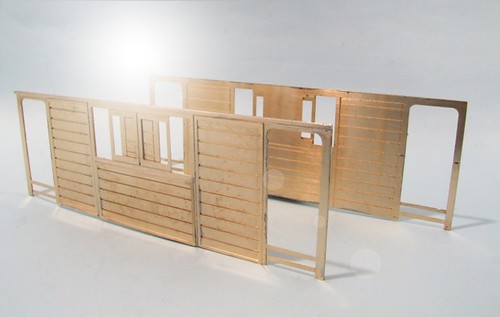
The Y6 tram engine sides are another neat piece of design. Each is a super-sized etching that folds back on itself to provide depth of detail and beef what could otherwise be a flimsy item up a bit. In addition the centre panel is another separate part, handily half-etched with a groove on the back to ensure alignment.
Assembly is simple - fold the parts and run solder around the edge. Attach the centre panel by running solder around the edges of this. Burnish like mad to remove the excess solder. Clean the sides up to remove solder and etch tabs. Finally, fit a strip to the top of each side.
The half etched parts in the doorway are there to make it harder to bend the frames in and keep the whole thing square. I'll take them out when the sides are firmly fixed to the floor.
Wednesday, March 20, 2013
Book Review: Dr Beeching's Axe 50 Years On
Marking the half-century since Dr Beeching's famous report on Britian's Railways - a report infamous for suggesting a drastic pruning of a much loved network - Julian Holland has listed every line closed at the time and provided a short history.
The book begins with a background to the report and it's effects. Holland is an enthusiast and this shows throughout the text. He points out that the statistics upon which the network was condemned were gathered in a single April week. Tranport Minister Earnest Marples is described as "motorway mad" although pedants will point out the motorway construction company was run by his wife and in no way will have influenced his decisions.
Barbara Castle gets off lightly despite the Labour Party campaigning against closures, a policy abandoned the moment they got into power. Personally, I'd have got far more ranty...
Beeching himself comes out things fairly well. He was asked to do a job and that is exactly what he did. In many ways, Holland proves his point - most of the line histories describe run-down and very lightly used services. They might have been valued by the communities that they served but often those same people preferred to use the new and shiny Ford Popular on the drive than a wheezing steam train that ran infrequently with old and uncomfortable rolling stock.
An optimistic note is struck where possible. History is brought up to date in places and some of the lines are being re-opened either by preservation societies or even local groups undoing the work of BR.
Photographs illustrate each line and these will be valuable resources for modellers looking to show the railway in the 60s and 70s. Amazingly, some of the closures didn't take place until the so we have both steam engines and blue and grey DMUs. The book design is very pleasing to the eye too. Everything is well laid out and clear. There's even a comprehensive index at the back.
Dr Beeching's Axe 50 Years On at Hobby Warehouse
The book begins with a background to the report and it's effects. Holland is an enthusiast and this shows throughout the text. He points out that the statistics upon which the network was condemned were gathered in a single April week. Tranport Minister Earnest Marples is described as "motorway mad" although pedants will point out the motorway construction company was run by his wife and in no way will have influenced his decisions.
Barbara Castle gets off lightly despite the Labour Party campaigning against closures, a policy abandoned the moment they got into power. Personally, I'd have got far more ranty...
Beeching himself comes out things fairly well. He was asked to do a job and that is exactly what he did. In many ways, Holland proves his point - most of the line histories describe run-down and very lightly used services. They might have been valued by the communities that they served but often those same people preferred to use the new and shiny Ford Popular on the drive than a wheezing steam train that ran infrequently with old and uncomfortable rolling stock.
An optimistic note is struck where possible. History is brought up to date in places and some of the lines are being re-opened either by preservation societies or even local groups undoing the work of BR.
Photographs illustrate each line and these will be valuable resources for modellers looking to show the railway in the 60s and 70s. Amazingly, some of the closures didn't take place until the so we have both steam engines and blue and grey DMUs. The book design is very pleasing to the eye too. Everything is well laid out and clear. There's even a comprehensive index at the back.
Dr Beeching's Axe 50 Years On at Hobby Warehouse
Tuesday, March 19, 2013
How to paint locomotive wheels

Ray asks: What is the easiest way to mask railway wheels when spray painting them?
The simple answer for me is: Don't bother.
Because all the locos I build have black wheels, I don't bother masking them off. The chassis is painted once I'm happy with the running. Then it's dismantled, cleaned, primed and painted.
If I'm feeling clever, the wheels get a coat at this point too. A quick shot of primer and then the same paint as the chassis. Treads and flange backs are polished clean - this process can be made a lot easier if you remember to wipe some WD40 from the no-mess pen on the parts to stay shiny first.
I'm just as happy to paint the wheels by hand when they are back in the chassis. Cleaning treads is then carried out by flipping the loco upside down in a Peco cradle and running it while fibre penning the paint away. If it's sticking really well, I'll lightly apply a scalpel to the treat as it spins but very lightly - the paint wants to be removed, not any metal!
All of this would be different for a set of lined wheels - you'd have to do this before re-fitting them or go mad playing "dodge the waggly bits". I might also think twice if I was using Gibson or Sharman wheels. Slaters and especially Romfords can be treated in a caviler manner such as this with no ill-effect whereas plastic centred jobbies might complain a bit more.
Monday, March 18, 2013
I don't care WHAT the instructions say, I'm doing it this way...
Since I want the body top to separate from the skirts, I've modified the upper footplate by hacking a great big hole in the middle of it.
To be fair, "hacking" is probably wrong. I carefully measured the hole to be made, cut around the edges with an Olfa Plasticard cutter and then used my piercing saw to help access these marks and open the metal out to them.
Then I tack soldered the footplate in place, drilled a couple of holes and fitted 8BA nuts and bolts. Now I can build the body on this and remove it with a little screwdriver work. The chassis can stay attached to the skirts.
All I need to do is unsolder the tacks and get on with the sides.
Sunday, March 17, 2013
Clayhanger Yard comes to the aid of our robin box
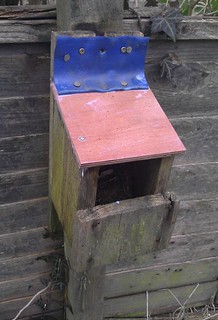
10 years or so ago, the place I worked took part in Learning at Work Day. I trained people in juggling (Since I normally ran courses in web page creation, something a bit more interesting seemed in order) and then took the opportunity to have a go at building a robin box, run by one of the Park Rangers.On the footsteps of Shire Hall in Warwick, we hammered together some bits of wood to make a suitable homes for our red breasted friends. I took this home like a child who'd made something at school, and screwed it to a fence post.
Over the years, a couple of birds have made the box their home but as the wood was never protected with varnish or preservative, the roof rotted away.
Anyway, the time had come to provide the birds with a new roof and as it happens there was an offcut of 9mm plywood left over from building Clayhanger Yard more than large enough for the job. A few minutes with a square, pencil and saw and I was able to nail the new lid back in place. I even varnished it with a couple of coats so it's a bit more rain-proof.
Saturday, March 16, 2013
Prototype for everything: Flaky transfers
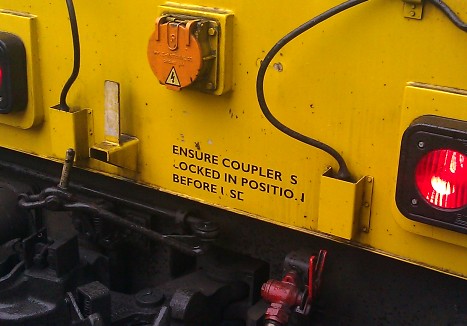
Sometimes, when I apply transfers to a model, they don't work very well. I'm sure I'm the only person this happens to - except it appears I'm not.
Seen on the front of a Chiltern Railways Class 67 diesel, these look just like my efforts sometime turn out. Most of the letters are there but not all of them. If I produced something like this, I'd probably start thinking about doing them again. Not any more!
Chiltern Railways - Excellent trains and not excellent excuse for modellers!
Friday, March 15, 2013
Have I got this the right way round?
I'm making some changes to the way the Y6 tram engine goes together compared to the way the manufacturer intends it to be assembled. On my model, the body and roof will be one part, the footplate and skits another. The chassis fits under all of this.As supplied, the kit makes it pretty easy to do this - there are two footplates so I can hack a bigger hole in one, arrange for it to bolt down and solder the sides and roof to it.
Inside there is a boiler, fire and smokebox. The hole will need to be big enough to fit over these so I've fitted them now. This has highlighted a problem - I think I've put the footplate in back to front.
You might think this doesn't matter but looking at the side view, there is a flap in the skirts that is off-centre. It's towards the front of the engine, presumably to allow access to the motion for oiling. On the footplate there are two holes for (I think) sandboxes and these should also be at the front.
They aren't on my model.
Since I refuse to take the skirts apart to fix this, I'll live with it. The smokebox has been placed at the correct front, where it should be under the chimney hole. Assuming this works OK, I'll carry on. Time to build the body next.
I should say that at this point only the brass bits have been fitted. There's a load of whitemetal to go in here and if I can find more information, some scratchbuilding too. That can all wait until the big bits are made and I'm happy all is well. If I have to unsolder anything, then the less the batter.
Thursday, March 14, 2013
Chassis kit, wagon loads and cassettes in Hornby Magazine
We're pushing the envelope a bit in the latest issue of Hornby Mag.
While many people would consider building an etched kit well beyond them, the editor has allowed me to have a go at explaining the basics using a Craftsman 0-4-4 as the basis. We've done etched kits before of course, there's an 02 diesel in the Parker's Guide bookazine, but a steam engine is another step on, especially one with a (possible) problematic wheel arrangement.
It's quite a nice kit and this is actually the third time I've built it. While not an obvious choice, you can't buy one RTR. There's not horrid waggly bits on the outside either. Best of all, the kit, while old fashioned in many areas, is a good solid model which uses tabs and slots for much of the part alignment. OK, so the finished model won't be as perfect as the latest RTR, but the missing bits won't be noticed on the layout. The satisfaction of running your own engine will more than make up for this.
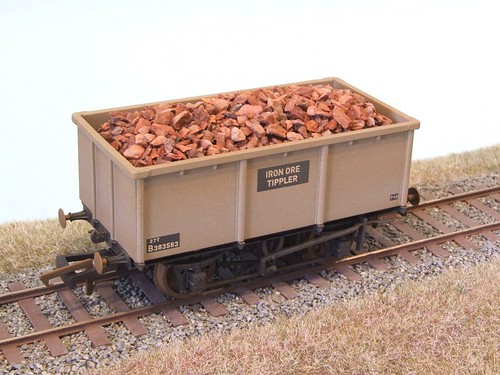
Elsewhere, I'm making wagon loads up using various methods. To help the readers, Geoscenics have produced some kits for this exclusively for Hornby Magazine. I've used these and 4 other techniques to fill wagons and they all work well. Even if you don't use the supports from the kit, the coal, iron ore and stone toppings are excellent. Good value too as one kit will do a train - well a normal length one, when your Garratt turns up. you might need to buy two for all those wagons!
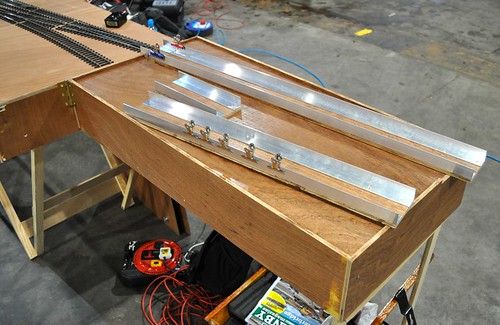
Clayhanger Yard gains a fiddle yard and also appears in public for the first time. For an O gauge layout, I didn't fancy sliding or spinning yards. Buying points would be too expensive and result in a yard as long as the layout. Therefore, we've gone for cassettes. Simple to build and very effective, I'm pleased with the results in use on the model.
Hornby Magazine Website
While many people would consider building an etched kit well beyond them, the editor has allowed me to have a go at explaining the basics using a Craftsman 0-4-4 as the basis. We've done etched kits before of course, there's an 02 diesel in the Parker's Guide bookazine, but a steam engine is another step on, especially one with a (possible) problematic wheel arrangement.
It's quite a nice kit and this is actually the third time I've built it. While not an obvious choice, you can't buy one RTR. There's not horrid waggly bits on the outside either. Best of all, the kit, while old fashioned in many areas, is a good solid model which uses tabs and slots for much of the part alignment. OK, so the finished model won't be as perfect as the latest RTR, but the missing bits won't be noticed on the layout. The satisfaction of running your own engine will more than make up for this.
Elsewhere, I'm making wagon loads up using various methods. To help the readers, Geoscenics have produced some kits for this exclusively for Hornby Magazine. I've used these and 4 other techniques to fill wagons and they all work well. Even if you don't use the supports from the kit, the coal, iron ore and stone toppings are excellent. Good value too as one kit will do a train - well a normal length one, when your Garratt turns up. you might need to buy two for all those wagons!
Clayhanger Yard gains a fiddle yard and also appears in public for the first time. For an O gauge layout, I didn't fancy sliding or spinning yards. Buying points would be too expensive and result in a yard as long as the layout. Therefore, we've gone for cassettes. Simple to build and very effective, I'm pleased with the results in use on the model.
Hornby Magazine Website
Wednesday, March 13, 2013
When you join the Gauge O Guild...
- Welcome to O Gauge - A guide to starting in the scale
- The latest GOG Gazette - A glossy A4 sized publication
- GOG rules
- GOG Video Library catalogue - Over 100 DVDs produced by the GOG that members can hire
- Guild News
- A list of area groups
- Details of the GOG website
- GOG events leaflet
- Guild sales catalogue - Sweatshirts, mugs, aprons and publications
In addition, I picked up a temporary membership card and an extra journal backnumber.
All this for £24
I know the temptation for many when they see a scale society offering membership at an exhibition is to take the leaflet, smile politely and then lose the paperwork. They do this even if the intention is to join.
It's difficult to compete with the lure of having some goodies to take away from the event and the promise of some interesting post in the future often loses out to the immediate gratification of taking away some packets of goodies.
This way, the new member has a physical manifestation of the results of thier spending. A heavy rucksack is a reminder that you have something for your money - better still, there is the promise of good things to come.
Tuesday, March 12, 2013
Boiler bits
Steam tram interior detail begins with a bit of metal forming.
All the parts show - firebox, boiler and smokebox arrive flat and require bending before being soldered to the ends. Putting the bends in the brass can be horribly complicated. If you are keen then you'll put the metal in some special rollers and gradually work the curve into it.
Not everyone owns metal rollers as they aren't cheap. Largely by accident, I own two sets.
I bent the metal around a Maglite torch. Well, it was handy.
Once bent roughly to shape, I tack soldered the wrapper around the end, helped by the inclusion of marked centre lines by the designer. When happy, the joint is seamed - a curiously satisfying process I find. Fiddling the parts into alignment can be frustrating but once you are happy and the solder is running, this is what kit building is all about.
Subscribe to:
Posts (Atom)