A daily updated blog typed by someone with painty hands, oil under his fingernails and the smell of solder in his nostrils who likes making all sort of models and miniatures. And fixing things.
Wednesday, October 09, 2013
Titivating a wagon
A couple of hours work and this is where I am:
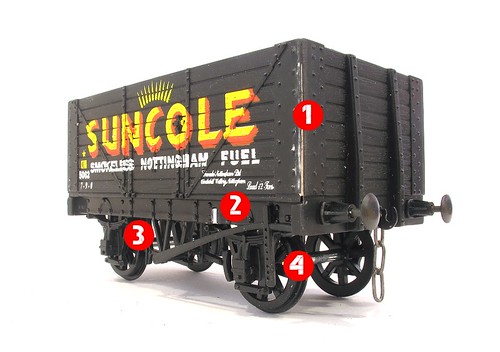
1 - Body corners have been stuck together with superglue and then filled. Pedants will spot that this probably means the sides lean in very slightly. They probably do and I don't care as it's such a tiny amount. I have spent time smoothing these corners as they should look like bent metal.
2 - Some plastic strip was trimmed and superglued in to place to fill the solebar hole. Gap filling glue is handy as it hides the worst of the fitting. The brake lever and bolt detail make filing difficult here.
3 - Drilling through the sides of the conjoined V-hanger and then carving away the excess plastic makes this fitting a lot neater. Replacement with etched parts would be better but I don't have any, can't be bothered to make any, and this will look OK on the layout. The safety loops still need attention but I had forgotten this when I took the picture.
4 - Slightly sticky wheels were traced to a little excess plastic on the face of the moulding around the axle. Trimming this back sorted it. Adding some lead weight underneath will help too.
Labels:
model railway,
O gauge
Subscribe to:
Post Comments (Atom)

No comments:
Post a Comment