Saturday, June 30, 2012

1 2 3

123

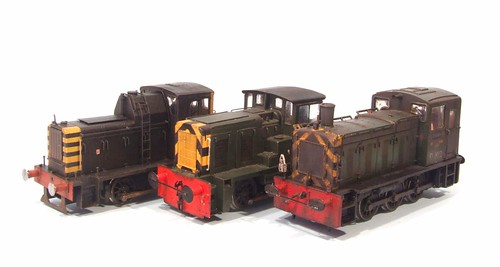
Now the 01 diesel is finished, the last job is to entomb it in the stockbox. As I searched for space in there, I couldn't resist photographing this line-up.

From the left:

Class 01 - Judith Edge etched brass kit.

Class 02 - Craftsman Models Etched Brass kit

Class 03 - Ancient Mainline RTR loco

One day I'll do the full 1-10 set but for that to happen, I need to re-build the 05 chassis, buy an 09 (Please Hornby, do BR blue livery) and convert an 08 to a 10. It's not much of a dream, but one day...

Friday, June 29, 2012

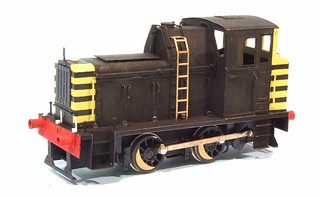
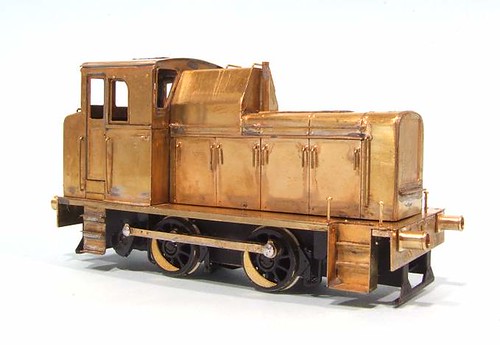
Class 01 Diesel shunter

01 Diesel

Yesterdays black paint needed a second coat to build up some colour depth but after that, things were plain sailing.

I couldn't resist numbering it as the very first loco in the TOPS list - 01 001. Those wearing tweed anoraks will point out that this loco barely ran before being confined to shed and canibalised for parts to keep 01 002 running, but as I always say, it's my train set and I'll do what I want with it. And I want 001.

The livery itself is accurate. The locos were given new numbers and wasp ends but never repainted from the all-over black first applied when new. The old style BR crest was also a feature to the end. It was a really old style version as the lion, or ferret, faced the front on each side of the machine. This stpooed when it was pointed out that the two crests were technically different and would need to be registered with the Heladry people seperatly.

My numbering comes from a very old sheet of rub-down transfers bought from Howes when they were based in the centre of Oxford. Amazingly they still work but using them is a bit fraught as you only get one go. Mind you, a sensible person would have applied the digits to some transparent backing film and then slid this in place. In one step it would make lining them up easier and replicated the black patch over the original numbers on the real locos. I was not that clever.

Transfers on and the model was sprayed with satin varnish and then wafted over with various greys and browns. I may well attach it futher in the future but for now, it looks fine to me. The prototypes wern't that dirty although possibly less shiny than my model. On the other hand, my version is less battered and it's staying that way !

All in all, this is a very nice kit. It goes together logically, all the bits fit perfectly. I look forward to running it on the layout in the future.

Thursday, June 28, 2012

Sometimes, brushes are better than spray guns

First coat of blackNow the wasp stripes are on and varnished, it's time to turn to the main body of the 01 diesel. This is to be painted black.

Simple enough you might think except that I don't want to risk the lovingly applied stripes. In theory, a little masking would allow me to spray with impunity (actually black paint but you know what I mean) but the very real life the handrails get in the way. Tape won't bend around them properly and I'm terrified of lifting off the stripes by pushing it too hard against the body. But if I don't do that, the spray could get underneath and ruin them.

Solution - it's a black loco and Humbrol's matt version is an excellent brushing paint. I'll do it by hand. Once the thing gets a spray of varnish, no one will ever notice.

The paint wasn't in the best of conditions but a little thinners sorted that out. I know a new pot would have made more sense but then so would not trying to finish the model for a competition. After the first coat, you can see in the photo that things weren't perfect but no bad either. I thin remembered all the bits that were supposed to be stuck on after the stripes and will need to be black too.

Wednesday, June 27, 2012

Wasp stripes

Ready for stripes

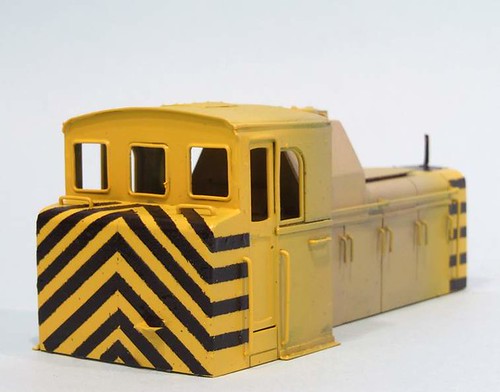
There isn't anything worse for the model locomotive painter to encounter than wasp stripes on the end of an engine. Lining, well, it's fiddly but if thin, hopefully acceptable.

Strips happen in some of the densest detailing on a model, have to be even, regular and any error shows up for all to see.

I looked around a lot for a solution for the 01. In the past I've marked the model up with pencil and carefully painted the black. Then touched up with yellow (which never covers well). Then a bit more black. Repeat until screaming ab-dabs set in.

Ian Rathbone, in his excellent book, suggests a method involving painted transfer paper cut into 2mm stripes and slid on the model like a transfer. I gave it a go and the results aren't bad.

Stripes on

Tuesday, June 26, 2012

The correct colour. Or not.

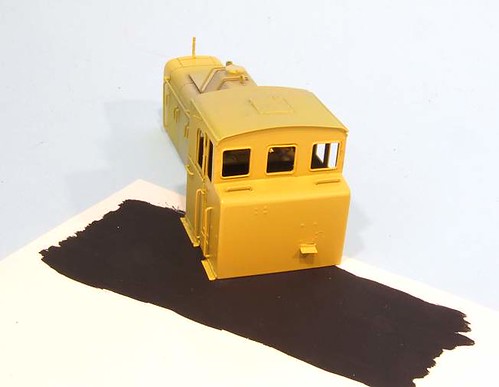
Painting beginsShould you use paint that comes in "authentic" colours or not ?

I have mixed feelings on the subject. Most of the time I'm too lazy to go to the shop and too stingy to spend the money on buying the real thing. A close-ish match from the Humbrol range will do me thank you very much. Given a coat of grime, only idiot pedants will disagree and face the pointy stick of doom from behind the layout at shows.

One exception is warning yellow. Humbrol produce a perfectly acceptable yellow, several in fact, but none quite looks right. On the prototype it's a slightly green shade whereas the nearest equivalent doesn't have this. To be honest, it's a subtle distinction and the requisite grime will probably hide the "error".

You have also to bear in mind that most train sets aren't viewed in daylight. Mine appear under normal incandescent lights and even if I swapped to daylight balanced ones, the light spill from the rest of the hall negates the effect. Only once have I seen a serious effort to deal with this issue but it came at the cost of a lighting control box the size of the model and even then couldn't defeat the sunshine through the windows facing the display.

Anyway, what I'm saying is that the yellow used is from Railmatch whereas the red buffer beams are Humbrol. Not quite right but I've never modelled a clean bufferbeam and don't plan to start now.

Monday, June 25, 2012

01 Diesel - Buffers on

01 coming together

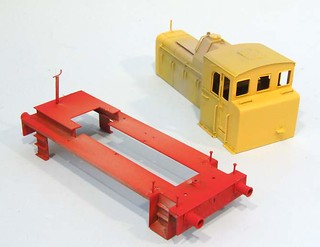
There is a point in any kit build when you put all the bits together without fixing them and the model you are aiming for is revealed. Up to that point you've probably got more bits on the etch or sprue than on the model and have to focus on relatively small areas.

For me, the "coming together" point on a model locomotive usually coincides with the buffers being attached to the beams. Something about the stubby housings sticking out from the buffer beam seems to work in my head. I'm not a buffer buffer by any means - as long as they look sort of right I'm happy - but they still matter. Heaven knows what I'll do when making American engines with their filthy foreign knuckle couplings.

Anyway, the 01 is there now. It looks like the locos I have pictures of. The running is acceptable and will improve with usage. I'm on the home straight. There's still a bit of detail to apply but at least it's now 01 shaped.

Sunday, June 24, 2012

Slo-mo drill in action


Hat tip to the toolmonger.com blog for pointing me at this video.

I'd guess you can work out what it shows as any reader of this blog is undoubtedly an erudite and well-educated individual, but in case anyone has accidentally ended up here looking for something else - Its a drill bit mounted in a lathe making a hole in a bit of metal. That's why the drill is still and the metal moves. An added bonus is it makes seeing what is going on a heck of a lot easier.

Maybe it's just me, but I find the point where the drill starts to work fascinating. The bits really cuts into the surface, a bit like a chisel, which is why it is shaped like it is. In fact, as you watch this, it it is obvious just how sophisticated the shape of a drill is to make a hold and clear away the swarf. Odd that we take them for granted as much as we do.

Saturday, June 23, 2012

Bow thruster

Bow thrusterAt the front end of the Canberra, there is a blanked out hole. On both sides of the hull.

In real life it's a bow thruster - an auxiliary drive at the front of a ship to allow the captain to swing the nose in sideways. Airfix put a blind hole in as a guide but then didn't follow through with a representation of the propeller that should be visible.

Undeterred, I drilled through the holes with a 4mm bit and scratchbuilt a suitable hole filler. The photo isn't great but you get the idea. The prop is made from a circle of plastic sheet with blades cut in it (I've assumed a 4 blade prop) supported on a length of plastic rod with some more to represent the central bulge that I assume holds the pivot and drive bits.

The design is a combination of ideas gleaned from a web search and what I reasonably thought I could build. It might be that there should be a grille of some sort over the hole but I reckon this would need to be so fine you wouldn't see it. Well, that's my excuse.

Friday, June 22, 2012

Drive crank saga

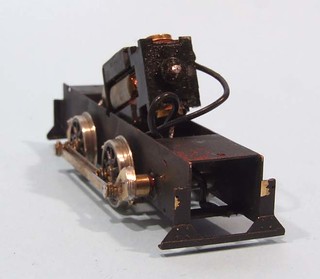
Getting CrankyNow for my least favorite part of building the 01 diesel - the drive cranks.

While the real loco might consider them a vital part of the drive train, on a model the whirly bits behind the cab steps are just along for the ride and not as helpful passengers. Decorative they might be, but they have the potential to hobble an otherwise nice chassis.

Building commences with laminating 4 layers of brass together to make each crank. Then the hole for the pin is opened out to size (1.3mm drill bit) and because I was feeling like doing a proper job, tapped to 10BA. Which promptly peeled the layers apart at one end. Not to worry, clean the swarf out and re-solder then all is fine.

Trouble started when I had to press the crank onto the shouldered axle. The first side is simple enough - trap the lot in a vice and squeeze. Crank 2 is a different matter as this has to be done with the chassis and all the bushes in place. With everything lined up I started to squeeze - at which point the crank fell off and vanished.

2 hours searching failed to find it. This included lifting a floorboard to see if it had managed to work through a gap a tenth of the size of the bit of metal.

According the kit instructions, you have to chose the set of crank etches you require from Romford or finescale. I had plumped for the former since those were the wheels I was using. In desperation I looked at the spare bits. As far as I could tell, the only difference was that the throw on the finescale versions was between 1/2 and 1mm smaller.

So, I made up another crank and soldered some wire into the hole for the pin. Then the new measurements were transferred from the existing crank using a par of compasses. This was drilled, tapped and squeezed on. The vice was spun around so anything falling off ended up on the modeling board and not the floor !

To keep the cranks the correct distance from the chassis I used some top hat bearings with the "brim" cut off. Had my measurements been a touch more accurate and I wouldn't have bothered with this as a couple of washers were then required to get things perfect.

After a bit of tweaking and much reaming out of the rods, the who lot rotates and doesn't seem to impede movement. A good thrash on the running in rolling roads seems to show all OK. Phew !
Thursday, June 21, 2012

ABS wheels + soldering iron = BAD

Melty wheel

Scale Link mode locomotive wheels. What an innovation. Just like Romfords down to the square ended axle and retaining nut. The only difference is that the metal centre is moulded in ABS plastic. The good news is that this drops the price by 2/3rds.

Woo hoo.

Of course if you don't remember that you thought you'd try them when you bought the kit then things can go awry.

I'm sure the instructions say to use the threaded Romford crank pins but I've long since lost those. I didn't think my stash included a set of these until a few days after I realised I needed them. Instead, I soldered the retaining washer on as per normal. Well I tried to. In my defence it's not obvious you have plastic wheels and not black painted metal ones like you used to get a few years ago.

If you are quick with the soldering iron, a skilled worked probably could get away with the standard  retaining washer. I wasn't quick enough. Result: a sunken crank pin and a previously good running chassis hobbling like a three legged donkey. Compare the left (good) and right (bad) cranks in the photo above for all the warning you require.

Guess who has a new set of metal wheels on order ?

Wednesday, June 20, 2012

Decks on. Boats in. Handrails up.

Decks and Boats in

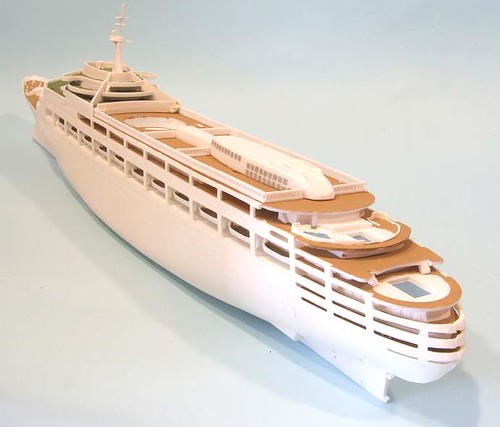
Aboard the Canberra I've finished gluing and clamping the decks into position. Apart from a little bit of touching up, we are there. Well, that and sorting out the alignment of the walkways at the stern.

The boats are fitted too. If you are building the same kit, pay attention here, they are handed. Rudders should face towards the back of the main vessel. Start in the middle too as one or two at one end of the row need to be trimmed a bit as the mounting holes you use want to force two bits of plastic to occupy the same place in the space/time continuum. A touch of the non-sonic scalpel (non-sonic unless you could the swearing when you discover the things don't fit) does the job without the results being visible to the viewer. I've left the front boats out for the moment as they have orange tops - presumably to aid mustering the fleet in an emergency and these need to be painted an satin varnished before fitting.

On the top deck, handrails have been fitted. Ideally I'd liked to have replaced these with something etched but no one appears to produce anything in this area. In lieu of this a bit of scraping has refined them a touch and opened up the holes flashed over in the mould.

Annoyingly the holes they should locate in aren't always in the right place. Usually the discrepancy is 1 couple of mm but enough that if they were used the handrails wouldn't fit properly. As it is there are one or two gaps to fill with microstrip but nothing major.

Tuesday, June 19, 2012

Mattness required

Matt VarnishAll soldering done, the 01 chassis was cleaned and primed. Then a coat of weathered black paint applied by hand (I like the thicker coat on the underframe and even if I didn't, the garage was too cold and damp to spray in).

The next day. Oh dear. I don't know why but I have shiny weathered black. Not what I was hoping for at all.

I did consider stripping the chassis back to metal but before such a drastic measure, decided to try a good waft of Testors Dullcote and sticking the thing in a box overnight to dry properly. In the morning, I the stuff had, for a change in my hands, done exactly what it said on the tin and my chassis no longer gleamed. Phew !

Monday, June 18, 2012

How to solder something very small

Tiny PlateWhere the brake hanger wires emerge from the chassis on the 01 diesel, there is a little plate. In 4mm scale it's about 2mm square (OK, triangular). This has to be fitted or the chassis won't appease the finescale gods. Doing this initially appeared tricky.

The problem is that solders goes where you don't want it and in this case, that meant the front face of the plate all over those lurvely rivets.

But, after a good strong cup of tea, the solution to the problem occurred to me. What I did was fit the wire through the chassis. Flux it both inside and outside the frames. Slide the plate over up to the frame and then solder inside the chassis.

Result: The solder flowed through the hole in the chassis and spread around the inside back of the plate. Just enough made it, something I suspect is controlled by capillary action or other science, to fix the item without covering it. This worked so well I did the other three plates like this, all look fine and needed no cleaning up. Excellent.

Sunday, June 17, 2012

An unexpected Cuneo

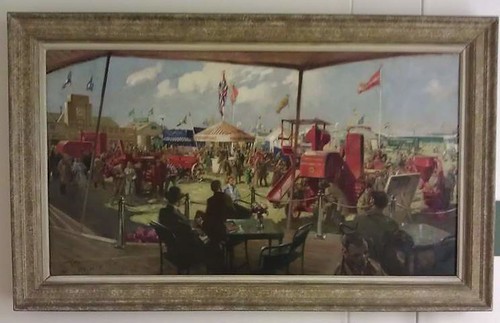
Royal Show 1951

Terence Cuneo is well known for his railway paintings but he produced a significant body of work without a train anywhere on the canvas.

This scene from the Royal Show in 1951 shows Massey Harris and Ferguson tractors. It seems odd, to my eyes at least, to see oil paintings of farm machinery rather than bucolic scenes but I like it. He has captured the hustle and bustle of this famous farming event in the days when it was a mobile entity and set up camp at a different location each year.

It's also very unusual in that the image is of trade stands at a show. Those who frequent trade exhibitions will have a good idea what to expect but for most, you simply don't see this end of the business. If you aren't a farmer, it's really going to be new for you.

One question - what are those machines ? Sorry the quality isn't great, it was taken on my phone in less than ideal (for photography) conditions.

Saturday, June 16, 2012

Prototype for everything - Plastic strips of tiles

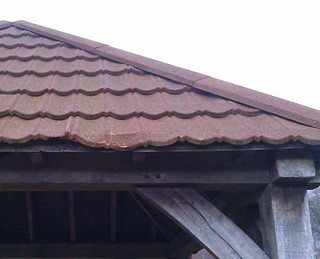
Wobbly TilesSpotted when wandering - A shelter next to a cyclepath. Although much vandalised, all the small woodwork and railings have long since gone thanks to the efforts of the kidz on this estate full of "executive homes", the roof is intact.

I noticed that one of the strips of "tiles" had slipped. It pretty obvious that instead of being individual tiles, they are in fact, strips of fibreglass pseudo tiles. Just like we might use on the roof of a model. Not quite Wills sheet but a method familiar to many of us !

Friday, June 15, 2012

O gauge "Pug"

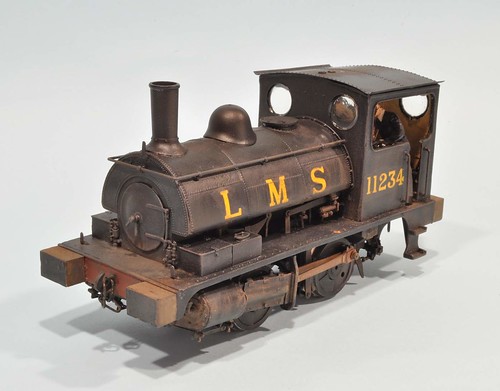
LMS Pug

Years ago I had visions of producing an O gauge layout. It would have been a shunting space not unlike Melbridge Dock but with barges rather than Clyde Puffers. We built some track from C&L Bits (have you seen the price of Peco 7mm points !) and a pair of pretty sturdy baseboards. The life intervened and we moved on to something else.

The boards are still in the shed and I have a stock box containing a few locos and wagons. In the stash there might be the odd spare kit too.

Anyway, this is one model I was always really proud of. An ex-L&Y "Pug" in LMS colours. Built from a Springside kit originally produced by Sevenscale. It's a very nice kit - fiddly but if you don't mind whitemetal, good fun. As I recall the bits went together well and there were plenty of them, important because it's not a cheap kit at the time.

The painting and weathering predates my airbrush ownership and was complimented by Martyn Welch when I sent him photos in an attempt to break into the Model Railway Journal. Sadly, he felt that the kit had been well covered in the 1980's and even 15 years grace wouldn't be enough. I remembered it from Scale Trains back then but felt differently. Sadly, he was the editor so won that battle.

On the other hand, I still have a loco I'm a bit chuffed with and when digging through the stock box recently, couldn't resist sticking it in front of the Nikon to see how it looked.

Thursday, June 14, 2012

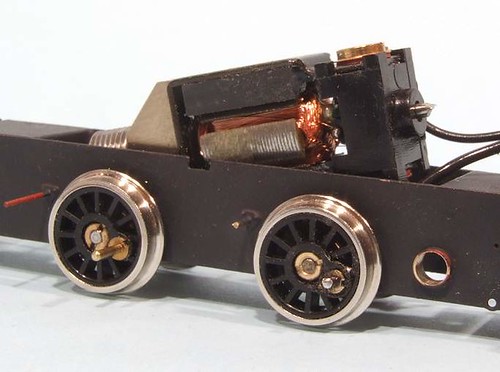
Keeping the 01 Diesel on the rails

RerailersThe arrival of the Modern Locomotives Illustrated on shunters nudged me into doing something about the 01 diesel that's been sat on my shelf for too long in brass. Perusing the instructions I can't work out where I should be so I decided that as the chassis was obviously unfinished I'd start there.

At each end of the beast, there are these beams to assist in re-railing it if it leaves the track. I'm fascinated by the idea that the trackwork in some yards was so rough that they expected to be shoving the loco back on a regular enough basis to warrant modifying it to make life easier.

To etches are supplied for this - one for P4 models 'cos they will fall off a lot, and one for OO and EM versions with those coarse flanges. Each part is in two bits. The back vertical and the front with the half etched plates above the beam. Assembly is easy apart from forming the bottom bend. There's not much to grab hold of so I started it in the hold'n'fold and finished with some square ended pliers which I find grip better.

After this, the verticals are soldered to the chassis using some half etched lines as a guide. With the minimum of solder, they look very nice with little cleaning up around the fiddly bits.

I wonder if I should insulate the beam to stop it shorting the rails if the loco comes off ?

Wednesday, June 13, 2012

Fine windows

Windows

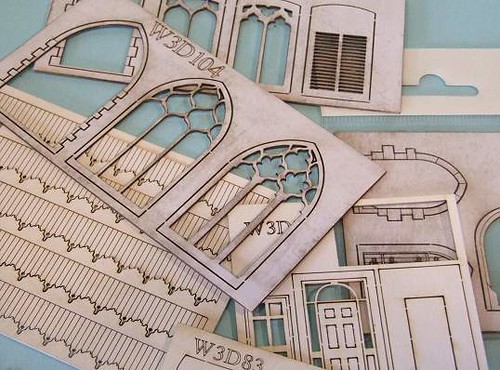
The nice people from TrueTexture keep sending me tantalising goodies. A full review will appear in Hornby Magazine in due course but I couldn't resist showing the contents of the latest package that arrived a few days ago.

You have to marvel at the quality of these items. The P4 crowd at the railway club were certainly impressed when they saw them. At 0.5mm thick, the card is as thin as an etch but probably easier for most people to handle. No priming required, just spray with colour or brush with some nice thin paint.

I've got a project in the queue that will be using some bespoke windows so watch this space.

TrueTexture Website

Tuesday, June 12, 2012

Deck clamping

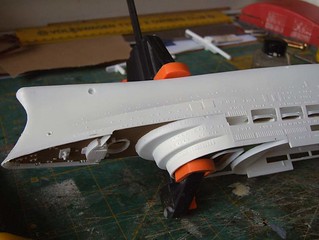
Clamping Over on the Canberra, I'm putting the pre-painted decks in place.

The kit is showing its age again with some bizarre break lines between parts. At the front, areas that should be flat have join lines in the middle of them that will be difficult to hide - all I can hope to do is minimise their impact.

My technique is to apply plastic cement and let the plastic soften a little. Then the parts are clamped together and prodded around to align them. This way, the soft plastic tentatively holds it's neighbouring part so they stay in the same plane.

The clamps shove the two parts together firmly and once dry, there are no gaps so I'm saved the hassle of filler work, quite a relief.

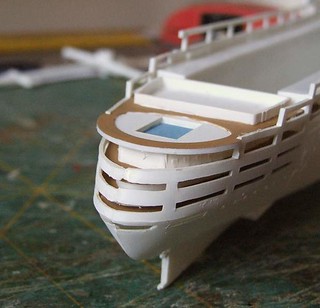
Back endAt the back end, the curved balconies are fixed, they just need tidying up to look like solid pieces of metal.

Vertical alignment between the two halves of the hull isn't perfect but with a bit of minor jiggling the decks appear to be in the right place with any errors hidden. We're talking fractions of a mm here so it's not difficult.

What IS a challenge is to pin down the colours. The pool surround should be brown it appears so I'll have to fix that but other work can now carry on while the paint dries.

Monday, June 11, 2012

Trim your scenery

Overgrown Track

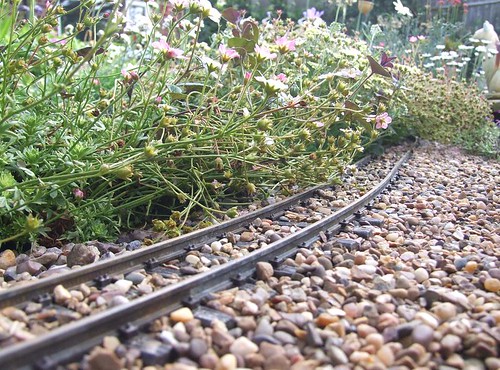
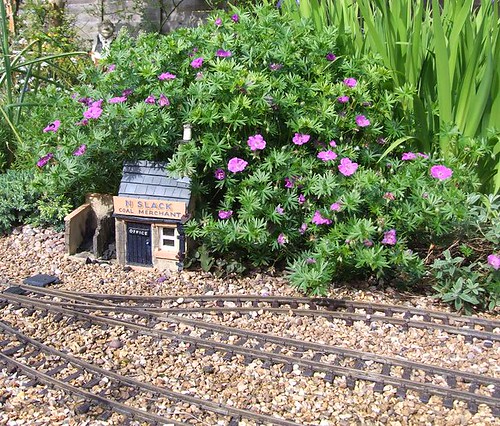
Oh, the joys of a garden railway. On indoor lines, when you make a hillside it generally stays put. Static grass looks good and once you've given the board a decent shake and waved a vacuum cleaner over it, the stuff is as immobile as it's name would imply.

Outside, we've had some weather. Mostly rain but with a few bursts of sunshine and that has certainly encouraged the plants to get growing. The result, at one end of the line it looks like a landslip has occurred. In fact it's just plants hanging over the track. I'll attack them with some scissors eventually and do my own miniature version of reclaiming the track bed like the those early preservationists had to do on long dead railway lines.

Over at the goods yard, N Slack our local coal merchant is surrounded by an explosion of purple. Fortunately, the heavy pottery hut (from Handcrafted Pottery Buildings) isn't going to be moved in a hurry !

N Slack