I don't like flying. As far as I am concerned, it's not natural. But if I do have to get on a 'plne, then I want it to be fitted with something more sophisticated than a couple of windmills under the wings. I want jets. My Father though, thinks they won't catch on and prefers something with propellers.
None of this explains why my Dad and I were given an Airfix jet engine for Christmas, but we were. And it has finally been assembled.
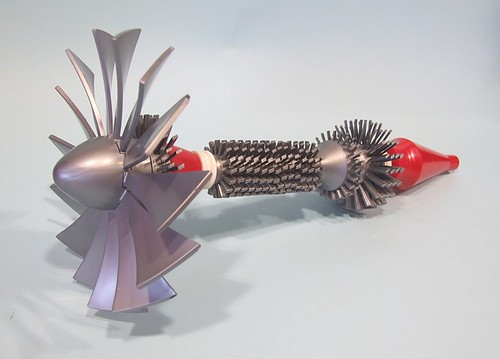
First up, this is a big kit. At around a foot long, I've seen smaller jets powering model aircraft. Assembly involves no glue at all (in an Airfix kit ? Sacrilege) just lots of small screws, thankfully spares are provided as they had a tendency to fall off the bench.
Most of the parts are huge lumps of plastic but in the middle you get the guts of the engine. Basically this is lots of bits with blades threaded on to a central spindle. Jet engines are pretty simple beasts - air in the front, heat it up and thrust comes out of the back - so the build isn't difficult at all.
The only problems were that the instructions are rubbish for the wiring. Get hold of someone who can wire up a switch and light bulb (any 6 year old) and you;ll be fine. Basically all the red wires are twisted together and all the black ones (to the other black, not the red obviously) and there is a switch. How this got through proof reading is a mystery as there are duplications and at one point a wire is attached to the battery box using heat shrink cable when you've already done this with a proper bolt. If your brain is on though, there shouldn't be a problem. I'll admit to clipping it all together before we really got stuck in to construction just be sure.
The compressor stuff (in the photo) also needs to rotate freely. By taking the red cone off the back and shoving the spindle back and forth once everything is in place you can put enough lash in to get really free turning. If there is any friction or bits clipping each other then it won't turn under power.
Turning is achieved by blowing air on the front blades. Very clever and you even get the right noises.
As a modeling project, this is a bit limited. Assembly is easy - probably about a hour or so's work and once you've played for a bit it's not awfully exciting. The mouldings are excellent, especially the clear ones. It's very good for a science project though, or just if you like unusual objects.
Just to prove we made it work, watch the short film below.
Airfix Jet Engine for sale on Amazon.
16 comments:
Hi Phil, I have just built one of these myself and even though the spindle turns freely, I cannot get it to spin up with air power alone (it always needs a push start). Full throttle will keep it going happily but if I turn it down below half power the engine will slow and stop.
Do you have any tips on how to get the excellent performance that I see in your video?
Cheers
Shuffle the fans back and forth to get the shaft running as freely as possible. We had the same problem but this seemed to cure it.
Good Luck!
I have built one of these myself but it does not spin at all even at full throttle. The spindle turns freely and I can rotate it by blowing but it is totally incapable of moving under it's own power.
my one didn't work. i ordered replacement parts but i then realised the battery box wasn't giving off power (i tested all the battery's and still nothing) anyone have an idea why it isn't working?
Are the battery terminals touching the batteries?
PHIL I got mine years ago and finally opened it up to find it didn't include instructions and like a good company I've been seen all over the place looking for a copy do you still retain a copy email me at boomdiers8@gmail.com
still not got grandsons turning but as far as the No Power problem goes, I found that Duracell batteries have a shorter top than others so I put a short piece of junior hacksaw blade between battery top and terminal and we got power, still not working but now thnk hacksaw blade might be reducing power somehow, will try solder on battery top to build it up. Mike.
Where can I get spare parts? Need the motor and another component
Can get in touch n sjmc50@hotmail.com
Airfix.com
Thanks for this Phil - your advice about shuffling the fans back and forth to get the shaft running as freely as possible helped about to get my son's kit working. One happy 12yo (and I'm pleased that his Christmas present is working too!)
Can u make a YouTube video on how to get it working as I've tried to get the parts and shuffled them back and forth but it still isn't working
Sorry, I've given the model away. Even if I hadn't, I'd have to take it to bits to make a video.
I bought this product quite a while ago and I have installed everything but the engine doesnt seem to spin with the given motor. Can you give me any advice?
Cheers.
All I have is the comments already on this blog post. The fans need to be VERY free running for this to work.
Currently building our engine but we're missing the engine spindle and can't seem to find a spare online. Any help pls
I got mine and there wasn't any spindle in the box. Has anyone made a replacement spindle
Post a Comment