 Time for a plan B. Actually, time to go and read some instructions but this is my blog so you'll not be surprised to see I go for plan B. Since I can't spike the rail to the sleepers as accurately as I'd like there needs to be an alternative method.
Luckily there's no need for any original thinking, just do what I do with etched kits - tack the part be fitted in place and then fix it properly.
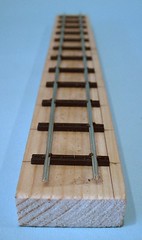
So, it came to pass that the rail was super glued to the sleepers. Best results are obtained using Zap-a-Gap which fixes the two nicely rather than a brushable Loctite which doesn't. Pity as the brush makes it easier to apply but when the rail falls off at the slightest touch convenience is outweighed by results. Mind you, a few drops applied from the Zap bottle seem OK and take long enough to grab that some deft work with the track gauge is possible.
Once dry, spiking becomes easy. The spike heads still have to be altered but at least the rail stays put. I've also discovered the spikes can go in at 90 degrees to the intended orientation and then rotate one past the rail head buy using a pair of very pointed pliers. If the top is still too long it just doesn't get turned all the way around.
The results are much better than before. One rail is arrow straight and the other isn't too bad either. I still don't fancy doing an entire layout this way - the Groudle project will, if it ever happens, be based on copper clad track but then it does have wooden sleepers so this will look fine.
Quite how you get the trackwork accurate enough for point work is still a bit of a mystery for me, although not as much as how you spike an entire layout without going crazy. I suspect that laying sleepers on tape alows for a tiny bit of lateral movement so perhaps glue is better after all.
Never mind, next I have to join the sections together.
No comments:
Post a Comment