A daily updated blog typed by someone with painty hands, oil under his fingernails and the smell of solder in his nostrils who likes making all sort of models and miniatures. And fixing things.
Monday, July 31, 2017
Check your goo
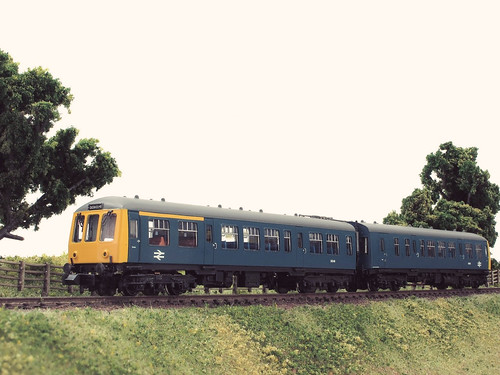
Before starting work on this kit, what I really should have done is worked out how the parts so far assembled had been fixed together. Looking inside the roof, you might think solder.
You would be wrong.
Judging by the quality of the solder work, the owner thought, "Stuff this. I'll use glue."
In theory, this kit can be assembled with glue. It's not a good idea though as the joints aren't that strong. I know this because a couple of times the sides have parted from the floor.
And I know glue is involved because when I solder the joint, it releases a plume of heated cyoacronite which is very bad for you.
Be warned, the correct thing to do is to dump the model in stripper or nail varnish remover and reduce it to parts, then solder. As it is, I'm nearly past the soldering stage so I'm not going to bother, but maybe I'll remember next time.
Labels:
hints'n'tips,
kitbuilding,
model railway,
NG Railbus
Sunday, July 30, 2017
Saturday, July 29, 2017
Saturday film club: A ride on the Groudle Glen Railway
All being well, as you read this, I am on the Isle of Man enjoying the enthusiasts events and (probably) dodging the rain.
With that in mind, what could be better than a ride on the Groudle Glen Railway?
Friday, July 28, 2017
When does an old car become a classic?
This is my 1.6 GLX 5d (AC)Peugeot 206 when I bought it back in 2008. Now 19 years old and looking just as good as it did back (I've even repaired the wing mirror) then, I need to sell it on.
The new job requires an awful lot of mileage and for accounting reasons, it's cheaper to stick me in a pool car than pay mileage. This means a somewhat newer Peugeot in front of the house and a 206 that didn't do many miles anyway, doing a lot less.
Sadly, despite driving well, looking good and being a generally very nice little car - I still like the look of the design which I think hasn't dated at all - it's worth pretty much nothing. According to Parkers Guide, while it might have cost £11,145 when new, the best price you'd buy it for is £585 and that's from a dealer. Private sales are nearer £100, although the consensus among people who know about these things is I could get £300, and a popular car buying site will give me £150 if I spend money MOT'ing it.
OK, the valuation is based on 200k miles rather than 85k on the clock (told you I didn't drive much) and a slightly lower spec than I have, but it's still not much for a nice driver where everything works (OK, the aircon needs a re-gas), timing belt has been replaced, the interior is in good nick and it's generally a pleasant place to be.
At 19, I'm wondering how long before it becomes a "classic"? 90s classic is all the rage at the moment in Practical Classics mag but for most, it seems the 205 is rather more than exciting than the 206. These are just old. Despite that, I could see myself polishing it up and showing the car in a field somewhere as people wander by saying, "I used to have one of those" and marvelling at the 6 CD player in the boot.
What I need is either someone looking for a cheap runabout or a nice dry and free, barn to sit it in until classic status arrives. But when would that be?
(Note: If you are looking for a cheap runabout or offering free barn space near Leamington Spa, please get in touch.)
Thursday, July 27, 2017
Monorail toy
Pete sent me the above photo last week:
Knowing you liking for monorails (amongst the
myriad of other things) I finally dug out one that I was given as a
present back in the early to mid 1970’s. See attached pic. Still works
back and forward including the headlight. Not the quietest of things.
Was produced by Winfield which apparently was Woolies own brand developed in the 1960’s (see part
http://www.woolworthsmuseum.co.uk/1960s-ownbrands.htm for full history.
I immediately stopped doing useful work and spent 20 minutes looking for other example and no, I couldn't find one either. Presumably this makes this a rare set or is it just that no-one else thinks they are worth photographing?
Even the monorail society don't have anything. Can any reader help?
Wednesday, July 26, 2017
Warehouse Wednesday: Newsons on the quay
Greetings from the Isle of Man!
This week we have something I believe was really a warehouse, right on Douglas quayside.
In the years I've known the building it has been operated as a retail establishment, the sort that sells "workwear" for roughty-toughty types, and me once when I needed a sweatshirt while on holiday.
An odd place to open a shop, the place being split in two by the loading bay. It's best remembered by listeners to Manx FM for their regular adverts inviting listeners to visit "Newsons on the quay"
The building is quite thin and even less distinguished when you look around the back. It must be some age though from the stone construction.
Newson still trade, but have just moved to the centre of Douglas. The online store still shows the quayside shop in operation.
Tuesday, July 25, 2017
Ladder
The railbus roof has a luggage rack at the back, so we need some way of getting up there.
Provision is made for a ladder in the kit but some of the parts were missing. I improvised with some long handrail knobs to the hold the vertical wires the right distance from the body.
Treads are cut from scrap U-section brass. A slot in the ends of each made with a junior hacksaw slips over the wires and then the whole lot is soldered in place. The solder covers the excess slot nicely.
Maybe flat treads would be more realistic but I like the chunkier U's. It seems more in keeping with the character this model is developing.
Monday, July 24, 2017
Grab rails and door handles
More railbus progress - grab handrails to help miniature people climb up the front steps and door handles so they can get inside. The sharp eyed will notice that the wire handles have been filed flat before fitting. I'm such a detail freak!
Both are attached too long and then cut once soldered. the extra wire makes handling them easier and I find snipping the excess off simpler when they are secure too. To be honest, I just cut the door handles off to match the vertical lines on the door. At least that way they all end up the same length.
Both are attached too long and then cut once soldered. the extra wire makes handling them easier and I find snipping the excess off simpler when they are secure too. To be honest, I just cut the door handles off to match the vertical lines on the door. At least that way they all end up the same length.
Sunday, July 23, 2017
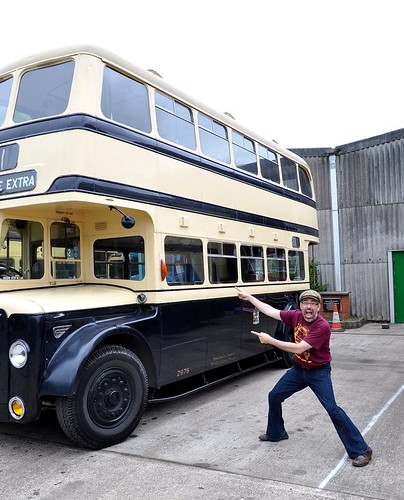
3D bus scan party!
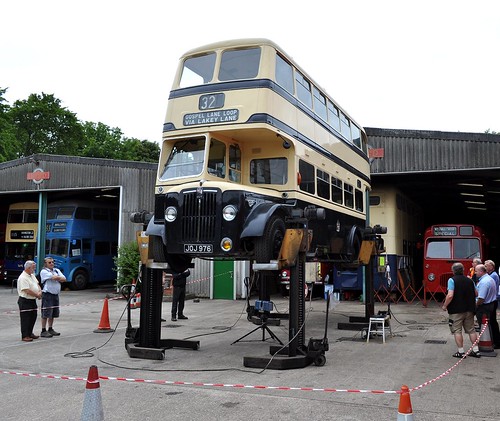
Bus enthusiasts are weird.
I mean, why would you fly all the way from Canada to scan a Birmingham bus? And then why would you decide it's a sensible commercial decision to produce this in 1:76 scale with breathtaking levels of detail?
Jason seems very taken by the Guy Arab bus he has decided to produce. No Routemasters for him, it has to be Brum!
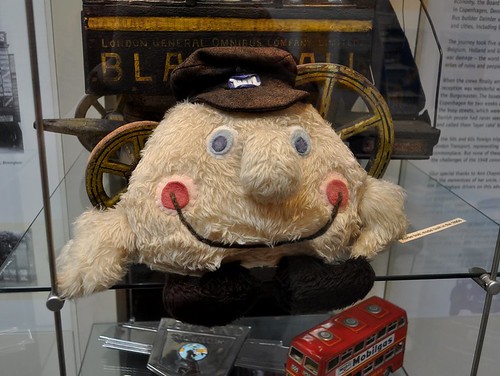
Maybe they didn't get a proper teddy bear as a child? Imagine what cuddling a WMPTE toy could do to a person?
Actually, it was a good fun day. Jason and Gareth from Rapido are excellent entertainment. We got to see a bus lifted up in the air. Wythall Transport museum is full of fascinating stuff if you like old road vehicles. The cake is good too.
Saturday, July 22, 2017
Saturday Film Club: Cosford Large Model aircraft
Today, I should be telling you about the joys of the Large Model Aircraft event at Cosford. Sadly though, as we headed along the motorway we discovered that when the Met Office tells you there will be "occasional light showers" that they mean is monsoon conditions.
Combined with a closed M6 and big roadworks on the M5 being mentioned on the overhead signs, we turned around and steered the car back through the floods. The point of Cosford is watching flying and the chances of seeing much of this in the rain were slim.
So, lets go back to Summer 2013 when the roads were open and the skies blue to enjoy some big models flying through the sky instead.
Friday, July 21, 2017
Brandbright coach in Garden Rail
In the last issue before I take over as Editor (gulp) I'm building a 16mm scale coach kit from Brandbright. Compared to the small scale models I normally build, it's a big model at a foot in length.
Clever design makes the panel painting really easy, even when you are rushing to hit a deadline!
A nicely detailed model inside, it would be worth lavishing lots of time on it. The finished model is very attractive and a rake running round the garden would look lovely in the summer.
Clever design makes the panel painting really easy, even when you are rushing to hit a deadline!
A nicely detailed model inside, it would be worth lavishing lots of time on it. The finished model is very attractive and a rake running round the garden would look lovely in the summer.
Thursday, July 20, 2017
Stations, footbridges, water and hedges in BRM
August is the BRM Scenery Special issue, so you won't be surprised that I've been getting my hands dirty.
We start with buildings. New Andy has built a station kit from 4Ground models and has made a few beginners mistakes. This isn't a problem, half the challenge when model making is knowing how to hide things, or at least bodge your way out of them. I've gone over the model and made suggestions for avoiding the problems and covering the results up if you get it wrong.
Sticking with buildings, I've upgraded a Metcalfe Models footbridge and despite the simplicity of the techniques used, the results are very pleasing. There's nothing wrong with the original kit, it's just that the customised version looks better than I'd hoped it would.
Given some Woodland Scenics water products to test, I went off and made a model boat club - well I would wouldn't I? The easy to use murky deep water is really nice. I can see me pouring more of it in the future.
I've been shooting layouts too. First, we have the diminutive and delightful Vale Quarry on 009. A self contained cameo style project, it's the sort of model I'd happily have a go at building in the scale and with the arrival of RTR locos in the scale, I can see plenty of others doing the same.
At the other end of the scale, but about the same length, is Lea Siding in Gauge 3. With some lovely detailed track and cobbles, it proves that you can work in the really large scales without a huge area. OK, this isn't an operationally exciting model but this doesn't matter, the fun is in the building.
Talking of building, on the DVD I'm making hedges using a variety of products. It's very much "green fingers" time for me!
Wednesday, July 19, 2017
Warehouse Wednesday: In the back streets of Bourne
My regular trips to the Warners offices in Bourne mean I'm getting ever more familiar with the town centre, at least the bit between the office and lunchtime pub (I don't have a desk so have no choice but to go out for lunch). Walking along the street, I can't help looking down the alleyways between shops. Being an old town, the centre has grown up organically, but it's managed to resist becoming a "clone town" and there are interesting sights to be seen.
Further down the street, a nice corrugated asbestos walled workshop or store - I couldn't see the front to find out. The roof is the same material but if you model it, sprinkle plenty of brown weathering powers or painty talc on top. That stuff needs texture as well as colour.
OK, this is "interesting" only if you like little industrial corners. This is beside a butchers and the owner though I'd got lost when I wandered down and took a snap on my phone. I explained it was for a model railway, the least mad idea I could come up with.
Nice small brick workshop with an asbestos clad building towering over it. Plenty of simple modelling potential, it's the sort of common scene that we tend to ignore.
Tuesday, July 18, 2017
Getting exhausted
As supplied, the railbus exhaust is just a bit of tube. To my mind this didn't seem right. Surely the rain would get down it?
What we needed was one of those funky tops that bob up and down in the fumeflow, shutting completely when the engine is off. Like those things you see on trucks.
A little bit of noodling around with some brass sorted it. I wrapped the top of the tube in a thin bit. A length of tube filed down would have been quicker but some bodgery with files and solder looked OK.
The cap was cut with a leather hole punch - it takes a bit of waggling the metal around to cut it but the result is circular and slightly domed. A bit of wire holds it up and slightly open.
At the bottom, a bit of tube and another punched circle beefs up the base of the pipe.
Probably an hours work while watching TV, and a very pleasant way to spent some time.
Monday, July 17, 2017
Adding the "nose"
Most of the bodywork for the railbus arrived ready assembled but it still needed a bit of cleaning up to sit down on the Bachmann chassis properly. I'm wondering exactly why this kit ended up for sale as filing away the excess solder in the corners for a good fit would have been one of the next jobs surely. Was the kit abandoned suddenly? Those red marks on the box, I assumed they were paint...
Anyway, with this looking good, I felt it was time to add the "nose" which gives the model so much character. Part fit was excellent and a few minutes with some 100 degree solder saw both this, the radiator and tool box in position. I'll polish the excess solder away later but despite being out of practise, they seemed to go on rather nicely.
Sunday, July 16, 2017
Butterley Garden Railway open day 2017
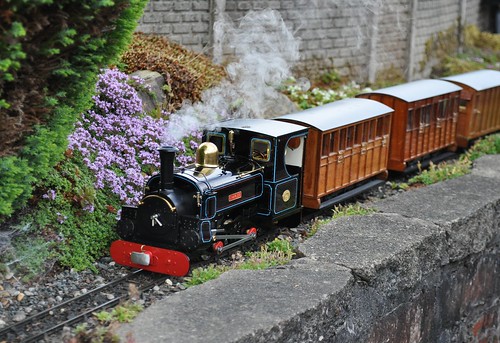
Needing to get out and about to see more of the garden railway world, I spotted that the Butterley Garden Railway Association were hosting an open day. Nice location on the Midland Railway and a bit of a run, but it sounded nice and I like small events as much as the big ones. You get more chance to chat and in this case, there would plenty of other things to look at.
The BGRA have a large, permanent track with both 32 and 45mm gauges in the station yard, a short stroll from the end of the platform. On the way, we passed the Star Tug exhibition I mentioned yesterday. There's also a hut with OO and O gauge model railways.
Being an open day, there was a little trade with a second-hand stall, where I probably should have bout an RC Playmobil loco, and a plant seller, some of who's goodies were stashed in the boot of my car later in the day. Moving inside another hut, John Sutton Books had a huge selection of pre-owned live steam locos as well as books.
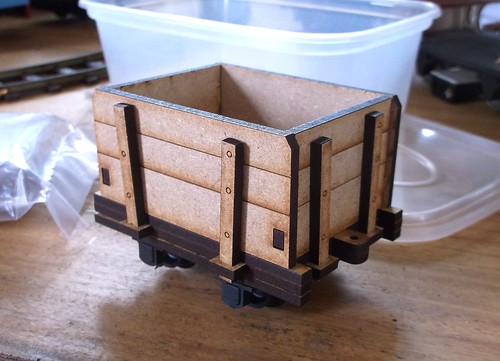
On one side of the room was a display of models from the cheaper (i.e. my) end of the garden rail hobby. Lots of IP Engineering kits. I was encouraged to have a go at building the mine tub made in laser-cut MDF from a guy who appears on eBay under the moniker vwmonkeyblue. Price for these is £7.50 each and construction takes less than 5 minutes. It even holds itself together without glue!

Back outside, I photographed some trains, I'm going to need the practice after all, and chatted to the secretary of the 16mm Association about various things. He was encouraging youngsters to drive a "Toby" by radio control. They seemed to take to this rather well.
The line is waist level and has two separate loops to offer a decent length of run. There is scenery and some nice looking planting but mostly this is all about operating your locos in a pleasant space. Being higher, there's no grubbing around in the dirt and it's easier to see for most members of the public. A fence keeps the crowds away from hot and valuable locos.
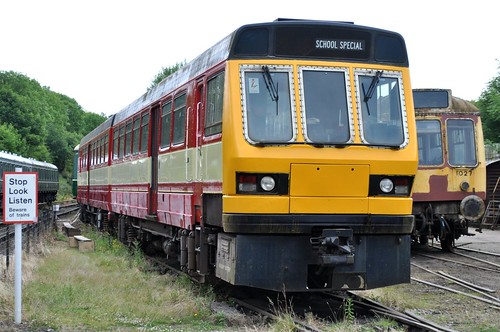
Around the yard, I took some pics of DMUs under repair and very interesting (to me, I know I'm weird) piles of spares and general bits. After this, there was a walk back to the station to find ham and cheese cobs followed by triangular scone and jam. Finish up with a trip to another model railway and I'd enjoyed a very pleasant few hours entertainment.

Saturday, July 15, 2017
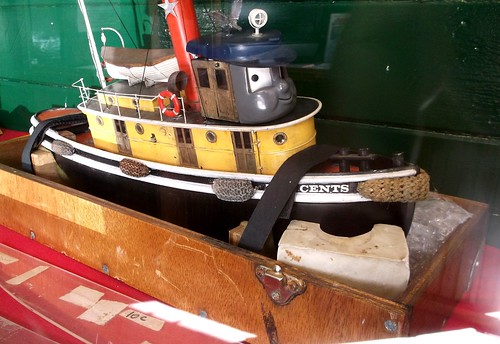
Saturday film club: Tugs
"Why are you showing us a 28-year-old kids TV show?, I hear you ask.
Well, it's from the same stable as the early Thomas the Tank TV shows - in the food days when it was all models and not CGI.
That and I visited the Star Tugs exhibition at the Midland Railway Centre last week, where there are loads of original models preserved from the series.
I couldn't help looking at the boats on show and thinking they would make very practical radio control projects. On screen, the models were moved on trolleys to give them some weight - if they floated then there would be a lot of annoying bobbing around. RC was used to work the faces and a separate feed blew smoke out of the chimney. It took 4 people to work each character!
With 13 episodes requiring a year to film and the series not taking off enough to generate significant merchandising revenue, it bankrupted the studio.
Maybe a long term plan, but making a model of a Tugs model shouldn't be too hard. Even easier if I could break in and take casting from one of the moulds they have in the cabinets for a hull!
Just look at the sets and models though. What a fantasic scene. Like the various Gerry Anderson series, I'd love to have a few hours on the set.
Friday, July 14, 2017
On30 chassis investigation and repair
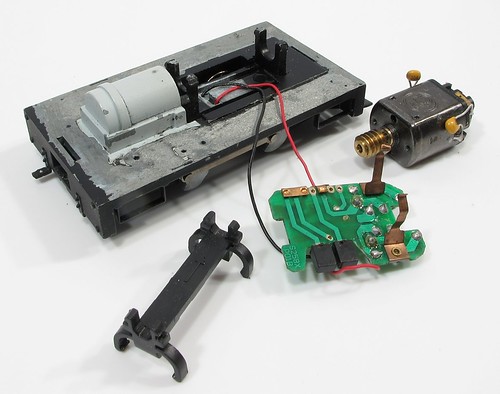
First job with the Inspection railcar kit was obvioulsy to plonk the Bachmann chassis on the track and and see if it works.
It didn't.
I wasn't surprised. There was a spare motor and set of wheels and rods in the box. That didn't bode well. Still, a little diagnosis seemed a good idea.
The surprise, for me anyway, was that the motor is clipped in place for ease of assembly. To remove it, the PCB is unclipped from the top and then the central plastic clip is taken out then the motor can be wiggled free.
Putting a bit of power into the contact, it spun over. Held back in, it drove the geartrain and wheels happily enough too. Putting the whole lot back together though, nothing.
After a few minutes applying power in different places, I diagnosed a couple of problems.
First, the wires from the pickups push into the circuit board. The red wire was lose so I stripped and tinned both of them for a better fit. I'd have soldered them to the board if required, but left that for later.
Second, the connections to the motor from the board are those phosphor bronze arms you see reaching upward in the picture. On wasn't quite making contact with the sides unless it was gently prodded. Re-bending it slightly with pliers sorted this out.
After less than 20 minutes work, my chassis was running back and forth sweetly on the test track. The kit is looking like a bargain now.
Thursday, July 13, 2017
Is it a bargain?
OK, so there I was rushing along the platform at Loughborough during the GCR model railway event. There wasn't a lot of time as I needed to have a look at the garden railway exhibits and my train to the main tent would leave in 25 minutes.
This box shouted out to me from among a pile of second-hand stuff. I couldn't resist a quick peek.
Inside there is a Backwoods Miniatures Inspection Car kit, partly built AND the requisite Bachmann Gas Mechanical chassis. The kit is £43 and the chassis, if you can find one, around £70. £113 worth of stuff for £20? Got to be a bargain, hasn't it?
The downside is I didn't have time to inspect the contents properly. The kit is part built, but at a glance, this looks OK. Being metal, I reckon I can take it apart if required. Missing bits might be an issue but the big parts all looked to be present.
That chassis is also an unknown quantity. Will it work?
Buying part built kits isn't something I recommend. You can easily spend more time undoing the previous owner's bodges than you would starting with a new model. Let's face it, there is a reason the kit is up for sale!
But, at £20, how could I resist?
Wednesday, July 12, 2017
Warehouse Wednesday: Classic Nissen Hut
Thanks to Brian Macdermott for this picture taken at Denham Aerodrome. A proper, classic, Nissen Hut.
You can tell it's a Nissen hut because, unlike many models, the sides tuck under a little at the bottom. Models tend to be half circles for ease of moulding but strictly speaking this makes them more likely to be an American Quonset hut.
I'm sure the bush isn't an original feature but for modelling purposes, I'd consider adding it anyway since it makes for a lovely scene. Plenty of rust on the corrugated sides too but very streaky. The hut also appears to be an extension to the brick building behind it, another useful feature for modellers.
Tuesday, July 11, 2017
Deck clutter/details
To fill the deck of the YSD derrick, I needed some "clutter" and while browsing for figure (which I also found) on the SGT's Mess website, I found these rather nice resin mouldings.
Each ends up costing 83p so hardly expensive. Quite a big cheaper than individual items in plastic or whitemetal. A few evenings pleasant work with a paint brush turns them into perfect details for boat decks, or those mucky corners of a model railway yard that need "something" to add a bit of interest to the scene.
Monday, July 10, 2017
YSD Self propelled Derrick
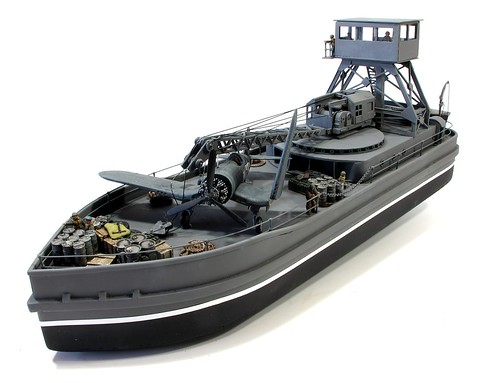
With Warship day approaching, a fair bit of effort went in to bringing one of my dad's projects to the water.
He'd built the basics of the YSF Self Propelled Derrik, or US Navy Wrecking barge, from a plan in Radio Control Boat Modeller. I can't date the plan as the magazine doesn't give a year but it's the September/October issue. No designer either but I'd put money on Glyn Guest.
Anyway, the hull is nicely simple, all the fun is above decks with a crane and raised bridge plus loads of detail.
Modelling nerds will spot the Airfix crane. Its easy availability set the length of the model as the gib should be nearly as long as the hull. This results in a boat a bit shorter than it should be. With 78 built (details here) there were many variations so we're not going to worry too much, at least not worrying requires scratchbuilding a complicated lattice structure.
Modelling nerds will spot the Airfix crane. Its easy availability set the length of the model as the gib should be nearly as long as the hull. This results in a boat a bit shorter than it should be. With 78 built (details here) there were many variations so we're not going to worry too much, at least not worrying requires scratchbuilding a complicated lattice structure.
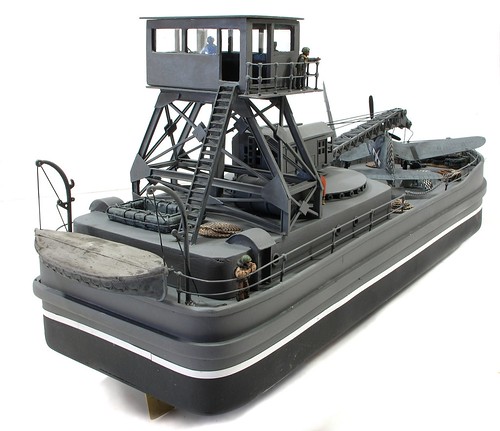
In charge of paint, I used several different greys (should that be "grays" as this is an American boat?) dry-brushed with Humbrol 64 to unify the scene. There's a bit more work to finish the model but after a frantic effort, we got it on the water and looking good.
Sunday, July 09, 2017
Surface Warship Day 2017
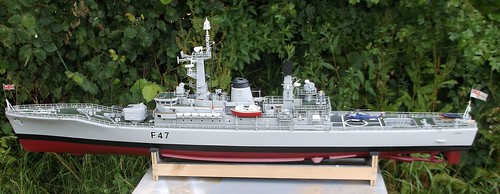
We don't see many "grey boats" at our model boat club. Warships are popular subjects but being large and full of detail, they are probably a "high days and holidays" sail rather than something you take down to the club on a Thursday morning.
Last week, one of these high days arrived with the Surface Warship Association holding a regatta on our water.
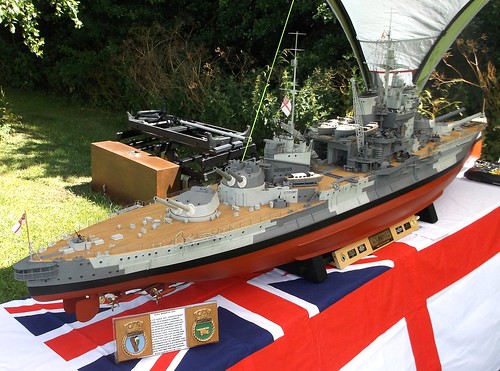
Largest boat present was a 9ft long model in 1:72nd scale (OO for railway modellers) of HMS Warspite. This arrived in its own trailer complete with a hoist built into the sides. Building a model this large is one thing, moving it is quite another!
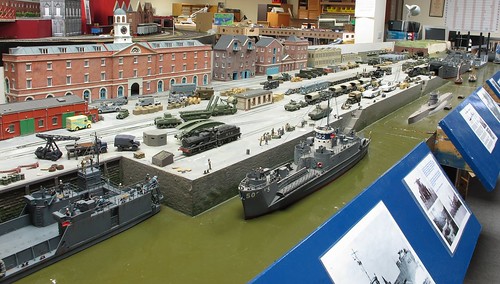
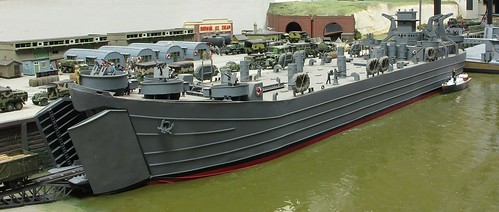
Most of my day was spent in the model railway club helping Chris Mead with his display. Overlord is a model of a dockside in the run up to D-Day. Elements of Portsmouth and Southampton Docks are brought together for a fantastic display that has appeared at over 100 shows in the last 25 years.
Chris had only brought half the model, we didn't have space in the room for the whole 40ft. This did allow for a separate display of boats not being used so we put on quite a show for the visitors.
Lots of people came in to see us and Chris was kept busy answering questions from interested visitors. I just did crowd control as lots of this stuff is a mystery to me.
On the water, there were many boats, about which I know nothing, so please enjoy all the photos on Flickr.
Saturday, July 08, 2017
Saturday film club: A ride on a OO garden railway
In my new role as Garden Rail editor, I've been looking at lot as outdoor lines on-line.
One thing I have learned is that garden railway fans are basically interested in the bigger scale - G and 16mm. Go bigger and it's really model engineering. Smaller and its, well model railways but not in the conventional sense.
OO outdoors seems to fall somewhere outside most people's interests and as such, rarely makes an appearance in model mags. OK, there was the model of Birmingham New Street and you do see the odd line, but in truth, people building indoor models care little for tales of concrete and fighting bugs.
Perhaps this is because the whole ethos is different. No-one is worried about finescale, thy seem to just want to see long trains doing their thing - and I can really understand that. It's lineside gawping in your back garden.
Today's video shows an nice looking line. Perhaps the closeups don't do it any great favours - cameras on layouts don't usually work that well as you see all the surroundings - but I bet it's great to sit by the tracks and watch long trains trundle past.
Friday, July 07, 2017
GMC truck shunter
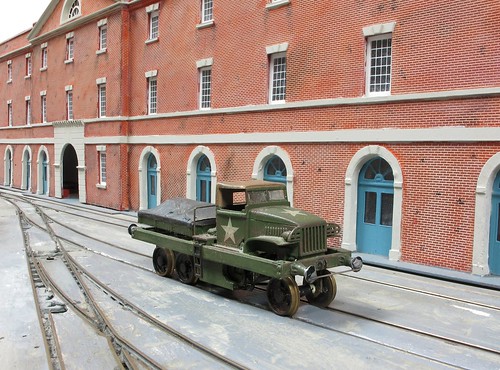
Last weekend, I was reunited with an old project.Always interested in unusual rail items, when Chris showed me a picture of a US GMC truck converted to a rail shunter, I couldn't resist having a go at making one.
My effort isn't perfect, but it sort of looks OK. We didn't have the right kit for the cab in the photo so a bit of modellers licence was employed to make a close copy. Power comes from a cheap motor driving the rear wheels using a much modified tramcar chassis.
It's many years since I built the model and it now needs some TLC to make it work properly. Not sure what I can do but hopefully it will run again.
Thursday, July 06, 2017
Filling the dream garage
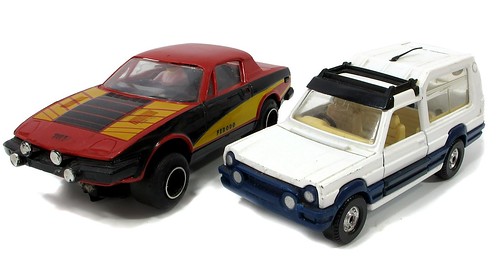
Most of us have a dream garage. Sensible people plan to fill theirs with supercars. Me, I'm going for something rarer than a Ferrari.
Obviously I can't do this in real life. Cost and space issues preclude buying the real thing so I have to, like most people, make do with models.
Recently, I've added some non-Volkswagens to the "collection" - a Scalextric TR7 and Corgi Talbot Rancho.Both were cars I loved the look of as a child and I think my youthful opinions are still valid.
Of course, the common factor with both cars is that in real life they were terrible rustbuckets. I read recently that there are less than 10 Ranchos on the road in the UK. Being made of toothpaste tubes and rust apparently isn't a recipe for long life.
The TR7 has fared better in that the really duff ones are long gone. There are still a few to be seen at classic car shows. I suppose if I really wanted to, I could own the real thing. Mind you, I'm not sure I'd fit in the tartan seats.
Both models are projects as I disliked the colours. That TR7 is especially horrible, but I can fix that. In fact I have some ideas and parts are ordered. The Rancho is sort of OK, but I always thought they looked better in bronze and I have some paint in stock which I've never experimented with in the airbrush...
Wednesday, July 05, 2017
Warehouse Wednesday: Airfield hut
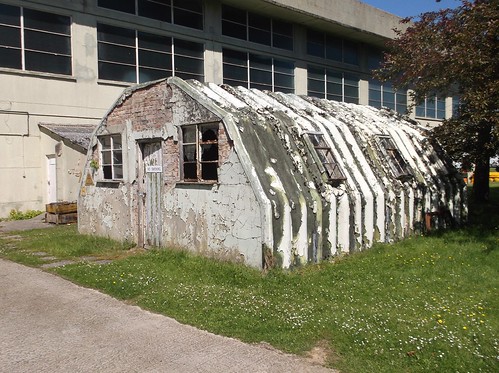
Found in the middle of the Cotswold Airport, this corrugated hut is slowly disintegrating beautifully. Plaster peels away from the bricks on the end walls while paint falls of the asbestos roof.
I've not idea what the hut was used for, presumably some sort of mess room, although the interior gives little away:
And before anyone suggests a bunker of some sort, there are several of these dotted around, looking like this:
Somewhat easier to model than the hut!
We'd stopped off on the way back from Warminster to look at the suprise jumbo jets standing around. My dad being an aircraft fan, I was glad that the planes scrapping company were shut. How we'd have managed with a 747 strapped to the car roof I don't know.
Tuesday, July 04, 2017
Coopercraft platelayers trolley
A little bit of product testing today. A pack of platelayers trolleys from Coopercraft have been knocking around for a long while now and when I wanted to test some Lifecolor weathered wood paints, I dug them out to be a test piece.
To finish off, I gave the model a wash of Games Workshop earth shade.
Coopercraft's kit is OK but not one of their best. The model seems very square when I think it should be longer than it is wide. Bonus points for providing OO and EM gauge fittings. Also a useful extra wheel. As a scenic item dumped at the side of the track, it's fine. Pity you can't get them any more...
Being acrylic, they are fast drying so progress is rapid. Assuming I wanted some nicely bleached wood, I used the paler base and once dry, dry-brushed it with the even paler highlights. It's nice paint to use with excellent coverage and being water-based, there's no smell.
The colours (note spelling, Americans, pay attention) are very nice. Certainly quite woody. Were there more detail (not to self: sand the plastic bits with something coarse to provide grain next time) I reckon the results would have been even better.
Coopercraft's kit is OK but not one of their best. The model seems very square when I think it should be longer than it is wide. Bonus points for providing OO and EM gauge fittings. Also a useful extra wheel. As a scenic item dumped at the side of the track, it's fine. Pity you can't get them any more...
Monday, July 03, 2017
Sunday, July 02, 2017
7mm NG Show in NGW
Over in the July 2017 issue of Narrow Gauge World, you'll find a report on the recent 7mm Narrow Gauge show at Burton-on-Trent.
There's a selection of photos - properly shot and stacked versions as opposed to the compact camera stuff on the blog. When someone else is paying for me to go, the least I can do is to keep the best shots for them!
I appreciate this can be a contentious point of view, at least it was on Facebook this week when there were a couple of grumpy people unhappy that I hadn't put the recent build of an N Brass kit on the blog for free, rather put it in a magazine they would have to pay for. Sorry chaps, writing for magazines is my job. If I give everything away then I don't have an income to fund the stuff I do give away!
Saturday, July 01, 2017
Saturday film club: Back to 1960 at Paddington
With the death of Michael Bond, creator of Paddington Bear this week, it seems appropriate to visit the station for a short film showing a ride from there to Reading, with loads of train spotting along the way.
I like that the film was shot on 8mm film hence the shots don't linger - the film was far too expensive for that. Nowadays with pretty much infinite amount of memory available to camera/phone users, being limited to 4 minutes per reel. That, and having to wait a week for that lovely yellow Kodak envelope to arrive in the post so you could see what you shot. Then cutting the film up and sticking it back together with the lovely, smelly glue...
Subscribe to:
Comments (Atom)

