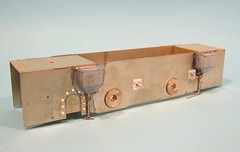
Back on the chassis, it is time to do some detailing. First I attached the sandboxes in line with the filler caps etched into the footplate. These aren't perfect replicas of the real thing as far as I can see but exactly what the prototype items look like is impossible to judge from the shots I have. Of course under the footplate you won't notice as they are pretty hidden away.
On the test build, the sand pipes were pretty rudimentary. Good enough for the garden but this time I've fabricated something a bit more realistic. Some 1mm wire and small brass washers representing unions so the job. To make sure the "pipes" are pointing in the right direction I test fitted a wheel each time - at which point I discovered that the read sandboxes are too far forward. Desoldering them using the gas torch (they were attached with 100 degree solder so fell off when I got enough heat in the nickel) and re-fixing back a bit appeared scarier than it turned out to be.
The brake hangers have metal plates bolted to the chassis, represented here with plasticard and slices of rod. This covers up the original hanger holes. I moved the brakes a lot closer to the wheels on this model which will look a lot better even if it does mean the wheels are trapped.
Finally, more slices of plastic rod were super glued around the gearbox aperture. Not sure how visible these will be but I know they are there.
No comments:
Post a Comment