 Sometimes you need a lot of identical items when building a model. In the example I'm about to show, the need came about because we had acquired an aged Airfix pontoon kit from an auction and knew that the pontoons themselves would be ideal as wagon loads on the layout. There were only a couple of snags, we needed at least a dozen of the things, and ideally, they wanted to be slightly shorter than those in the box.
Luckily, I've done a bit of casting on polyester resin in the past so didn't see a problem. All we needed was one correct pontoon and I could make replicas from this. That's a whole lot easier than performing a cut'n'shut on lots of models. You also don't end up with loads of leftover bits from a pile of kits (See legal note at the bottom of this post though).
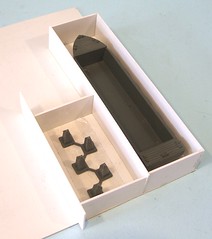
The pontoon was prepared and stuck to a sheet of plasticard. Walls a few mm higher than the top of it were made with more plastic. Some people use Lego for these but all of mine is up in the attic and the plasticard is to hand. While I was at it, I did some tank obstacles in the same way, although the glue wouldn't stick these down so double sided tape was used.
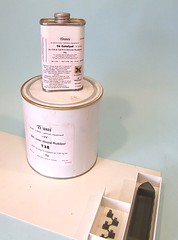 Next, the mould material was mixed up. The stuff I use is from Tirantis (a very helpful company to deal with) and is designed to set at room temperature. This is important as it allows the masters to be made in plastic. Some other moulding methods require metal masters assembled with silver solder as they are poured at high temperatures. The downside, if you can call it that, of my method is that you can only cast in resin, not whitemetal or brass. Mind you, some pretty convincing brass look resins are available if it's just the look you are after so it's not such a big limitation.
Anyway, the mould material is mixed up as per the instructions (95% mould to 5% hardener) and slowly poured over the masters. The consistency is a bit like very tick custard. I try to pour around the master to give any air the best chance to escape. Once the mould is full, air bubbles will surface and can be popped with a pin. One other advantage of this stuff is that no mould release is needed to get the parts back out again. (Health & Safety Note: This is a bit smelly. Read the side of the can and make your own mind up about this)
The material takes a couple of days to set fully, or at least that's how long I leave it. You certainly need 24 hours and I like to give it more time before removing the walls in case only the top has set.
The walls are peeled away and assuming all is OK, the masters released from the plastic sheet. I then leave them for half a day to let the air get at the bottom of the mould. Again, I'm probably being over cautious but better safe than sorry.
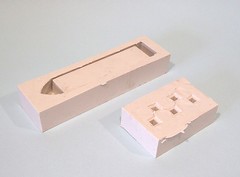 Finally, the mould is flexed and the master released. The resulting mould should produce 25 perfect copies of the master if I'm careful it. To be honest I should have made the sides a bit thicker but will probably be OK. I'll find out when I try pouring the resin in a few days time...
Legal note. I'm no lawyer but as I understand it, casting parts this way is acceptable as long as you are only using them yourself. You can't sell them and certainly should not pass them off as the originals. On a more practical note, this doesn't necessarily work out any cheaper buying the kits. The mould and resin all cost money and have a limited life-span. Of course, if you make the masters yourself then you can cast away and put the results on eBay if you want to.
No comments:
Post a Comment