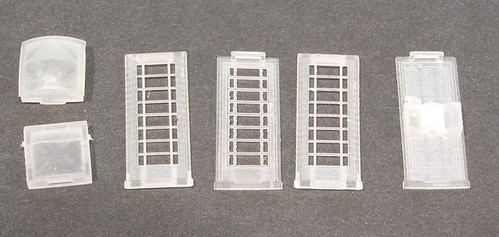
Yes, the final (for the moment) trip into the world of 3D printing has arrived. The man from UPS dropped off a box big enough for a reasonable sized cat or two modest tubs of ice cream. Inside was loads of polystyrene and a small packet containing the parts show above. Methinks that Shapeways boss ought to go down to the packing department and have a quiet word with them.
Anyway, the parts are printed in a soft and flexible material which apparently allows for greater detail than the stuff used before. It certainly works - those glazing bars are incredibly thin. Even injection moulding would be pushed to replicate this. The telephone on the back wall is very nice too, better than the whitemetal ones I've used in the past.
Assembly required simply clipping the sides into the base and then the top on to these. Some glue in the corners is a good idea. One problem is that the material makes the parts very difficult to see and it took me a couple of goes to work out that the door must be opposite the back wall or the corners don't work. It's very flexible too making things a little more tricky.
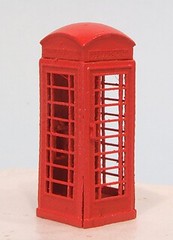 Once stuck together, I sprayed the model with Modelmates primer and then several coats of Humbrol satin red. Slightly too many as it turns out as one of the "Telephone" signs is a little flooded. With the paint on I could also see my duff assembly, too late to do anything about it. Let's just hope no-one notices the door is ajar... The surface of the sides isn't flat either but covered with micro furrows in bands. From normal viewing distances the effect is OK by if you look very closely you'd wish you'd used etched brass.
Finally there is a problem that may or may not be connected with the material - the paint won't dry. 18 hours after spraying, it's still tacky.
K6 box on Shapeways website
3 comments:
I had that with some matt varnish once - it took months to set. Not sure why, it was well mixed and from a good manufacturer.
I wonder how well Halfords primers and car colours would work?
Looks great BTW!
I've heard of someone else having that problem (paint not drying) on another 3d print model, so may well be a reaction to the material.
I'm currently giving the model light sprays of Humbrol Satin varnish which seems to be making a difference. One thing I didn't mention, the red paint was the same tin used on the 48DS buffer beams a week ago, where it dried very nicely.
Post a Comment