Nearly there with the Bulldog locomotive. I'm down to the fiddly detailing, something not helped by the incredible number of changes applied to these locomotives through the years and the lack of assistance in the instructional diagram. The later shows parts that aren't supplied being fitted in holes that don't exist. Thankfully February 1983 issue of Scale Trains magazine has the only useful batch of images I've found anywhere.
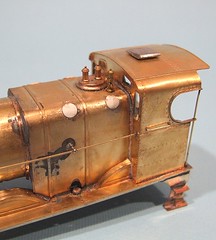
At the top of the firebox I initially managed to fit (very neatly actually, I was so proud) the parts I later decided were for the sandbox tops. There are some fusible plugs (I think) up there in the era this model is set. The form of these seems to vary but in LMS days all that is visible is a round, flat, plate. Some suitable plates are supplied on the etch but cutting them out, I lost one and so had to replace them with disks punched out of the thinnest plasticard I could find. It's about the same thickness as the boiler bands which is correct according to the photo - although in the model these are a touch over-scale.
Plasticard is sometimes easier to work with than metal. Once superglued in place, it's a lot easier to gently sand to a perfect fit with fine emery. Once painted, who can tell what materials have been used anyway ?
1 comment:
As CJF used to trot out, "a coat of paint hides a multitude of tins"...except that on this model the unpainted finish is something to be proud of...certainly nothing to hide here.
Post a Comment